


Thursday, April 13 2023
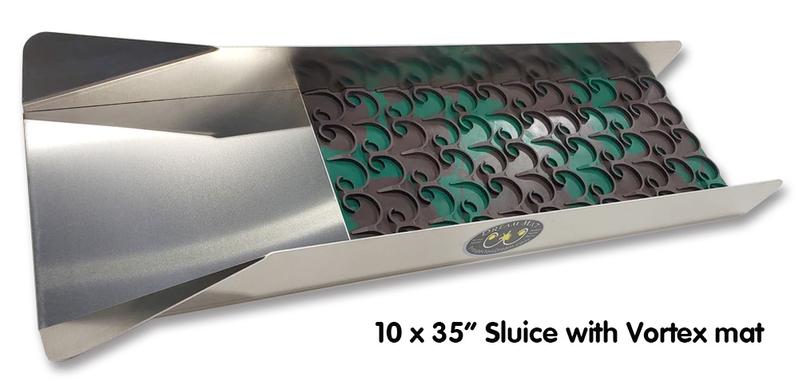
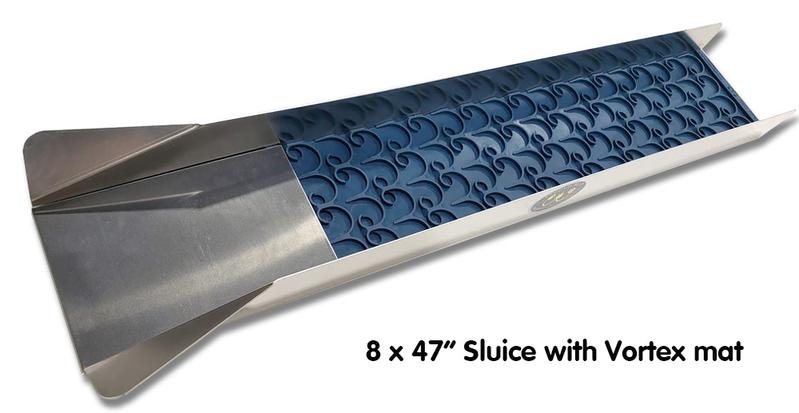
Over the years you may have tried many different types of mats, carpets, riffles, and miners moss, but Dream Mat was inspired solely Mini Dream Mat is ideal for sandy areas and black sands. Great for 1/4"-3/8" screened runs. Catches the gold everyone is missing! Mini Mat is great for that hard to catch gold!
Browse Now — Dream Mats for Stream Sluices, Power Sluices, and Gold Cube. Saturday, November 19 2022
If you’re used to water mining, having success in the desert might seem challenging— that is until you start thinking of desert ground During a river high-water event in a non-arid area, gold is moved over a larger area by massive water flows that continue until the water slows as the source dissipates its energy. Spring snow runoff is a good example. Rivers rise and sometimes flood based on the upstream water source. When the snow has melted, the river will slowly get back to normal. In the desert, gold is moved in the exact same way with the exception that water powerful enough to move gold does so and then just simply stops. In a flash flood, gold is moved very violently and often a very short distance, sometimes percolating into valuable pockets. Here’s where the difference between water and desert mining principles comes into play generally flood gold will concentrate in areas that do not meet the standard thought of inside bends and where the water flow becomes lower. For the most part, desert mining experts recommend staying out of the washes, gulches and dry river beds— that is unless you clearly see exposed bedrock. Gold will settle fairly quickly when it is trapped behind jagged bedrock and small fault lifts that have not been worn down over time by constant water flow. It IS true you can find areas of concentrated gold-bearing material in the washes, however, the amount of time and energy to get through feet of overburden is usually just not worth it, especially when there are higher values to be found outside of the wash. Follow the leads out of the wash to where the gold lives in higher concentration. Test and sample areas you see with a great deal of runoff from a tributary coming into the main wash. Here you are only digging through the current flood layer and testing for flood gold. Make your way out of the wash carefully looking at the bottom of the tributary and the areas where the water flowed into the tributary. Look closely for jagged bedrock and slight lifts in the ground and then prospect. Continue to test each of those spots. What started as a few specks of flood gold in the main wash can lead to larger and larger deposits on the flats or in slight inclines across the desert floor. Keep in mind that when a flash flood is dissipating, there is not enough energy to move a lot of rock, but the sand will continue to flow a bit, creating great clues. In general, cool season precipitation (October through April) is the most extensive source of rain in the desert regions. Rainfall is more widespread and of relatively long duration during the cool season. On the other hand, warm season precipitation (May through September) results largely from short monsoon-type thunderstorms. If you’re ready to head to a sunnier climate this winter, keep these tips in mind and you just might find enough similarities between water and desert mining to make you return every year. Good luck! Friday, October 01 2021
Sluicing is one of the most popular gold-recovery methods, and a sluice box is often a miner’s first purchase after a basic gold pan. There are many options to consider— riffles, matting, brands, and sizes. You might want to stick with traditional z-riffle sluices with ribbed matting and miner’s carpet, try the new mini or vortex Dream Mats without riffles, or a combination of different types of miner’s moss. No matter what you choose or upgrade to, sluicing techniques are fairly straight forward. The three main things to concentrate on for best gold capture are: proper selection and set up, material classification and processing, and monitoring. These three key steps will allow you to maximize gold recovery. Proper Set Up. This is by far the most important aspect of gold separation and recovery and includes angle, horizontal leveling, and water flow. Improper sluice angle is probably the most common error most miners make. The old rule of thumb of setting your sluice to “one inch per foot” is just a starting point and can result in too much water velocity. Too much water leads to improper breakdown and separation of heavy concentrates and material moving through the box too quickly, which can mean loss of fine gold. A Sluice Setter Digital Pitch Gauge can help, and so can focusing on water velocity instead of just the angle. Try the “one second per foot” method. Measure 12 inches down your sluice and mark that spot. As you feed material into your sluice using a side-to-side motion, count “one thousand one.” Your material should be passing the 12 inch mark as you finish that count. If it needs to be faster, increase the rear angle. If it needs to be slower, decrease the rear angle. As material travels down the sluice, be sure you are utilizing the entire capture area. If material is being forced to one side or the other, leaving one side clogged with too much material, while the other side is not processing at all, it could mean the sluice is not properly leveled horizontally. Material Classification and Processing. In order to capture small gold in quantity, finer classification is usually necessary, even though it’ll take more time to do so. Processing speed and the volume of material to put into the sluice (by hand or by scoop) must be matched to the volume and velocity of the water. If too much material is introduced into the flow, the water velocity will slow down causing the sluice to back up and lose gold. Gradually add smaller amounts of material to the flow using a wide scoop. Monitoring Your Sluice. When using stream flows, you are bound by the characteristics of that waterway—water speed, depth, and the ability to change your sluice angle. Mechanical flow is not limited by nature since you can control it. But no matter who is controlling the water (you or Mother Nature) monitor two factors while running gold-bearing material: how the sluice is processing the material, and the capacity of your sluice. How much can the sluice hold before it loses the ability to separate heavy materials and capture gold? If you see movement of heavy material down the sluice or movement of captured gold, it’s time to remove your sluice from the river, clean it, and reset it. When processing difficult material, set up a regular cleaning schedule so you don’t lose gold. Applying these three main techniques while sluicing — proper selection and set up, material classification and processing, and monitoring — will allow you to adapt to changing conditions no matter the type or brand of sluice box you prefer. And remember that old saying "practice makes perfect" — using the same gold-bearing paydirt over and over again means you can learn these techniques and tips much quicker and recover more gold! Friday, December 29 2017
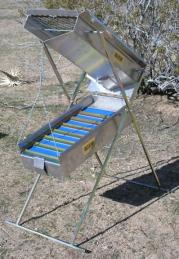
Given a choice, most miners prefer using water to wash and run material, but in some dry, remote areas that Clay is generally known as a great gold robber, making clay-bound gravels the biggest difficulty to overcome. In most of the placers directly derived from weathering lode deposits, the placers are in ravines, gullies and hillsides with sometimes very little gravels and mostly decomposed fragment of rock and fine silt from the decomposing host rock. Host rock containing a lot of feldspars are most problematic. As feldspar breaks down, it creates some difficult clays and silts that bind fine gold to small rocks and sand with the clay and silt particles forming larger clods. Loamy or sandy conditions are much easier to process with a drywasher than clay-bound material due to the absence of clods and clumps. But if dirt clods are giving you grief, break them down with a large hammer on a canvas tarp, or use a mortar and pestle (dolly pot). Once you are set up to run material, process in short runs before cleaning out the riffle tray (perhaps after every three 5-gallon buckets). Frequent clean ups minimize the amount of fine gold that may creep or walk down the riffle tray with the tailings. This method uses your dry washer as a form of a classifier to screen off larger material while getting rid of much of the fine silt and lighter weight material. Re-running tailings can aid in the recovery of lost gold— especially small gold dust and flakes. The second pass through is usually much quicker than the first time because the material has already been classified. With some placers, especially flat, fine gold, rerunning material can be very lucrative. In places where gold is more coarse and angular, very little gold will like be recovered by running the tailings a second time. You may want to experiment with adding a second layer of cloth to a portion of the riffle tray. Doing so reduces airflow by almost half in that section. In addition to the riffle tray, the void under the riffle tray can collect a sizable amount of really fine gold mixed in with fine silt. No doubt there are going to be losses of gold when using a drywasher to recover fine gold (20 minus mesh down into the 200 minus gold), but the end goal should be to limit those losses as much as possible and these tips should help. Good luck! Learn more about Gold Buddy drywashers here. Nugget of News Blog Wednesday, June 14 2017
Fun and exercise are two great reasons to go gold prospecting, but you might as well make some money while you're at it, right? The best way to do that is to increase production rates. Assuming you are mining on a known gold-bearing claim or waterway, volume is the key to your success!
A dredge or highbanker/suction dredge combo is the next step up. A dredge uses a gas motor to generate the suction that will load and transport the material to the sluice, which greatly increases volume, as well as allows you to reach gravel on the river bottom that would otherwise be inaccessible (unless the river is seasonal or there is a prolonged drought). The more material a dredger can push across the riffles, the more gold can be recovered. An additional benefit to dredging is that it also allows you to clean gold out of all the cracks and crevices in the bedrock. A shovel just cannot do that. The size of the dredge intake nozzle is the most important factor in how much material a dredge can process, but it is not a direct one-to-one relationship. For example, a 5 inch dredge will not move twice the material that a 2.5 inch dredge can move. It actually can move much more. The surface of the hose is figured in square Beyond dredges or highbanker/suction dredge combos, you can get into some professional mining set-ups that use trommels and jigs and shaker tables and earth moving equipment. Every deposit is different, varying in size and grade and structure. Environmental conditions and access will dictate mining methods and knowing the rock types and size of the gravel is critical in determining which equipment will work best for increasing your production. Finding a suitable deposit to mine and finding a way to work it economically— to justify your time and expense— is the first step. Then choose the right equipment to increase your recovery rate and speed of recovery and make more money. Good luck! Tuesday, November 15 2016
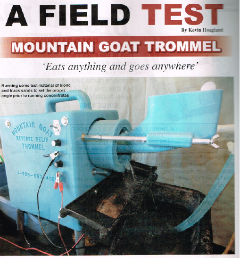
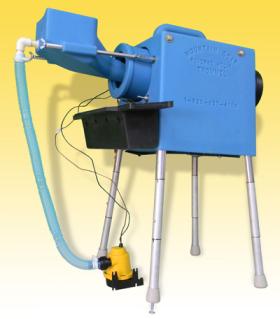
The Mountain Goat Trommel is not new to the prospecting industry by any means, but it has just recently been field tested by Kevin Hoagland, host of the GPAA-produced TV series Gold Trails. Kevin's complete Field Test was published in the November/December 2016 issue of Gold Prospectors magazine. Below is an excerpt or you can Download the complete Mountain Goat Field Test here (6-page .pdf). Invented by the late great Angus Niccolls who started Camel Mining, the Mountain Goat Trommel has a long history of excellent gold recovery and easy of use. It will handle .5 inch minus material with the optimal recovery The Mountain Goat is a variant of the Archimedean Screw, which is a tube surrounding a rotating screw used to pull a column of water up a grade. This makes it possible to easily lift water. In the Mountain Goat, the outer tube is lined with the screw, and as gold-bearing material is stratified by a stream of water and run through the tube, the heavier gold-bearing material is deposited into the reverse screw and brought to the top of the unit. The lighter waste material is continually washed and pushed through the unit into the tailings. In other words, when material enters the hopper, the gold goes one direction and the water goes the other. It’s really no different than huge trommels, except that the Mountain Goat does all of this in a unit that weighs less than 20 pounds, and recirculates about 10 gallons of water all day long. And if set up properly, the manufacturer says it can handle about two yards of material in a long day of running. The Mountain Goat Trommel is cleverly designed. It’s compact and almost completely assembled when you receive it. The carry handle is molded into the unit, making it easy to transport (especially if you are riding a quad or other vehicle). The trommel tube is pre-mounted to the unit with the nugget trap installed, needing no further assembly. The legs are collapsible and can be set to two different heights. Plus, the front legs are further adjustable to allow you to fine tune the unit to the material you’re working. The pump is 12-volt, and the flow rate was chosen to offer the best recovery possible. It is recommended that But before you use it for the first time, or if it has sat unused for a while, be sure to clean the unit with hot water and a little unscented dishwashing soap. Hook up the unit and allow the soapy water to do its job of removing the release agent that comes on just about any product that has been molded. Sponge down all surfaces exposed to water and the outside of the unit, too. This simple cleaning step can prevent gold loss. You might want to clean the machine outdoors as the soap bubbles can go everywhere! As you use the Mountain Goat, continually test the tailings. You should not see any gold. If you do, you may need to increase the angle of the unit by turning the screws on the front legs. It’s a bit of trial and error, just as it is when setting up a sluice in a stream. The Mountain Goat can be paired with the Desert Fox Spiral Wheel for a complete two stage concentrator and final recovery unit. Nugget of News Blog Sunday, January 11 2015
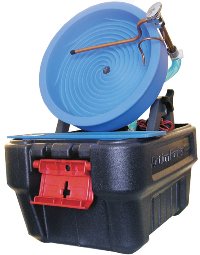
"... The Desert Fox ships in an Action Packer case that is the storage, transport, and water container unit. It provides excellent protection for the Fox while giving you a true compact recirculating unit that can be transported easily. Unpacking the container was simple and for those of us that spend little time looking at the way something comes out of a container, the manufacturer has included a photo in the manual to show you how to repack the unit so it's back to being travel-ready in just a few seconds. In the container you will find:
Setup takes just a few moments. The wheel frame is a single point A-frame that sits perfectly in place in the container and allows you a stable, easy-to-set-up base for the spiral unit. The A-frame construction also allows the unit to be set up directly in a stream. Stand the A-frame in the container, lift the drive unit to a beginning angle, slide the double-wall wheel into the slot on the drive motor, attach the spray bar, fill with water, hook up to a 12-volt power supply (not included), and after a couple of fine tuning adjustments, the Desert Fox is ready to start running your concentrates. Total time from cased to running is about two minutes! The A-frame mounted drive motor allows you to easily make small adjustments to the angle of the wheel. This ease-of-use factor can become critical when running materials that require more precision. Water flow is controlled by a single-point knob on the spray bar assembly, and the speed control is located on the back of the unit. These 3 adjustments are all you need to ensure efficient gold recovery. Before first use, be sure to clean with a good quality dish washing soap to remove all the manufacturing oils (mold-release agents from the plastic parts). Do NOT use a citrus-scented soap because the scent is derived from oils, which is exactly what you are trying to remove. Use hot soapy water and a non-abrasive pad. Spiral panners work in reverse of traditional hand panning. Instead of gravity separating gold from concentrates with the heavies sinking to the bottom of a pan, a spiral machine uses speed, water, and the angle of the spiral wheel to keep lighter material in the bottom of the wheel, while the heavier black sand and gold is brought up the leads. When set correctly, the sands drop off at the last moment and only gold is moved through the center of the unit and recovered in the cup.
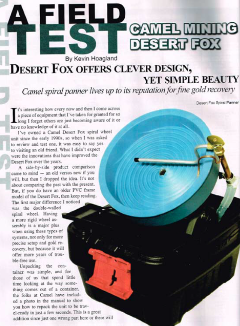
Starting with the water first, find the lowest water pressure that will clean the light material from the leads as it climbs up the pan, adjust the angle and speed as needed so the heavy sands drop off at the right spot and you're ready to start processing your concentrates. After completing the basic setup, I adjusted the speed to keep the unit tuned in to variations in the types of material I ran. There are two models of the Desert Fox— a constant speed ($339) and a variable speed ($359). Since the difference in price is just $20, I highly recommend the variable speed model. The Desert Fox is a straight-forward and simple spiral wheel system that recovers gold efficiently, and has been manufactured by Camel Mining since 1969. It is compact, weighs about 10 pounds, and is ideal for carrying into the field. Gold recovery is exceptional and the learning curve is short..." Click here to learn more about the Desert Fox Spiral Panner on this website. Click image to download .pdf of field test review. Monday, July 01 2013
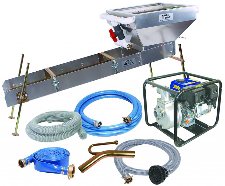
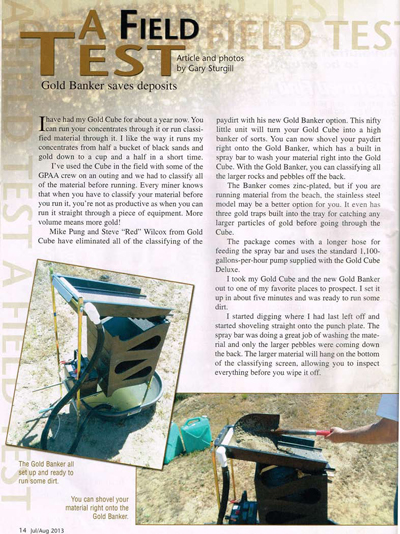
The Gold Cube is now shovel ready! Take the hassle out of pre-classifying and increase your yield at the same time! The Gold Banker was field tested by Gary Sturgill, Trade Show Manager for the Gold Prospectors Association of America (GPAA). His review appears on pages 14-15 in the July/August 2013 issue of Gold Prospector Magazine. Gary rated this new product 10 out of 10 for its easy for assembly, durability, and time savings. If you don't have a copy, here is what Gary had to say:
"I have had my Gold Cube for about a year now. You can run your concentrates through it or run classified material through it. I like the way it runs my concentrates from half a bucket of black sands and gold down to a cup and a half in a short time. I've used the Cube in the field with some of the GPAA crew on an outing and we had to classify all of the material before running. Every miner knows that when you have to classify your material before you run it, you're not as productive as when you can run it straight through a piece of equipment. More volume means more gold! The Gold Banker eliminates the pre-classifying of the paydirt. This nifty little unit will turn your Gold Cube into a high banker of sorts. You can now shovel your paydirt right into the Gold Banker, which has a built in spray bar to wash your material right into the Gold Cube. With the Gold Banker, you can classify all the larger rocks and pebbles off the back. The Banker comes zinc-plated, but if you are running material from a saltwater beach, the stainless steel model may be your best option. It even has 3 gold traps built into the tray for catching any larger particles of gold before going though the Cube. The package comes with a longer hose for feeding the spray bar and uses the standard 1,100 gallons per hour pump supplied with the Gold Cube Deluxe. I took the Gold Cube and the new Gold Banker out to one of my favorite places to prospect and set it up in about 5 minutes and was ready to run some dirt. I started digging where I had last left off, and started shoveling straight onto the punch plate. The spray bar was doing a great job of washing the material and only the larger pebbles were coming down the back. The larger material will hang on the bottom of the classifying screen, allowing you to inspect everything before you wipe it off. Wednesday, May 02 2012
Place your sluicebox in the flow of a stream or river so that the water enters the flared end and flows through the sluice. If the current is strong you may need to lay some stones against the edge of the sluice to keep it from washing away. The sluice should be set at a downhill angle that allows the material to briskly flow through it. The higher the volume of water available, the shallower the angle will be. Wednesday, December 22 2010
If you're like many prospectors, you collected a few buckets of concentrates this summer and figured you'd process them during the winter when you had more time. Now those buckets are probably in the garage, the basement, and taking up space in the shed — and someone else in your household might be complaining that they are in the way! Three great products can help you process those concentrates more easily and quickly, especially if it's fine gold: Desert Fox automatic spiral panning machine, the Magna Two, and the Catch-It II Water Table. All of these machines are simple to operate. You won't need much practice before you discover how efficient and easy they are to use. With gold around $1,400 an ounce, the sooner you get those concentrates processed, the sooner you can reap the monetary rewards of gold prospecting!
Wednesday, November 10 2010
If you're like many prospectors, you collected a few buckets of concentrates this summer and figured you'd process them during the winter when you had more time. Now those buckets are probably in the garage, the basement, and taking up space in the shed — and someone else in your household might be complaining that they are in the way! Three great products can help you process those concentrates more easily and quickly, especially if it's fine gold: Desert Fox automatic spiral panning machine, the Magna Two, and the Catch-It II Water Table. All of these machines are simple to operate. You won't need much practice before you discover how efficient and easy they are to use. With gold around $1,400 an ounce, the sooner you get those concentrates processed, the sooner you can reap the monetary rewards of gold prospecting!
Monday, March 29 2010
|
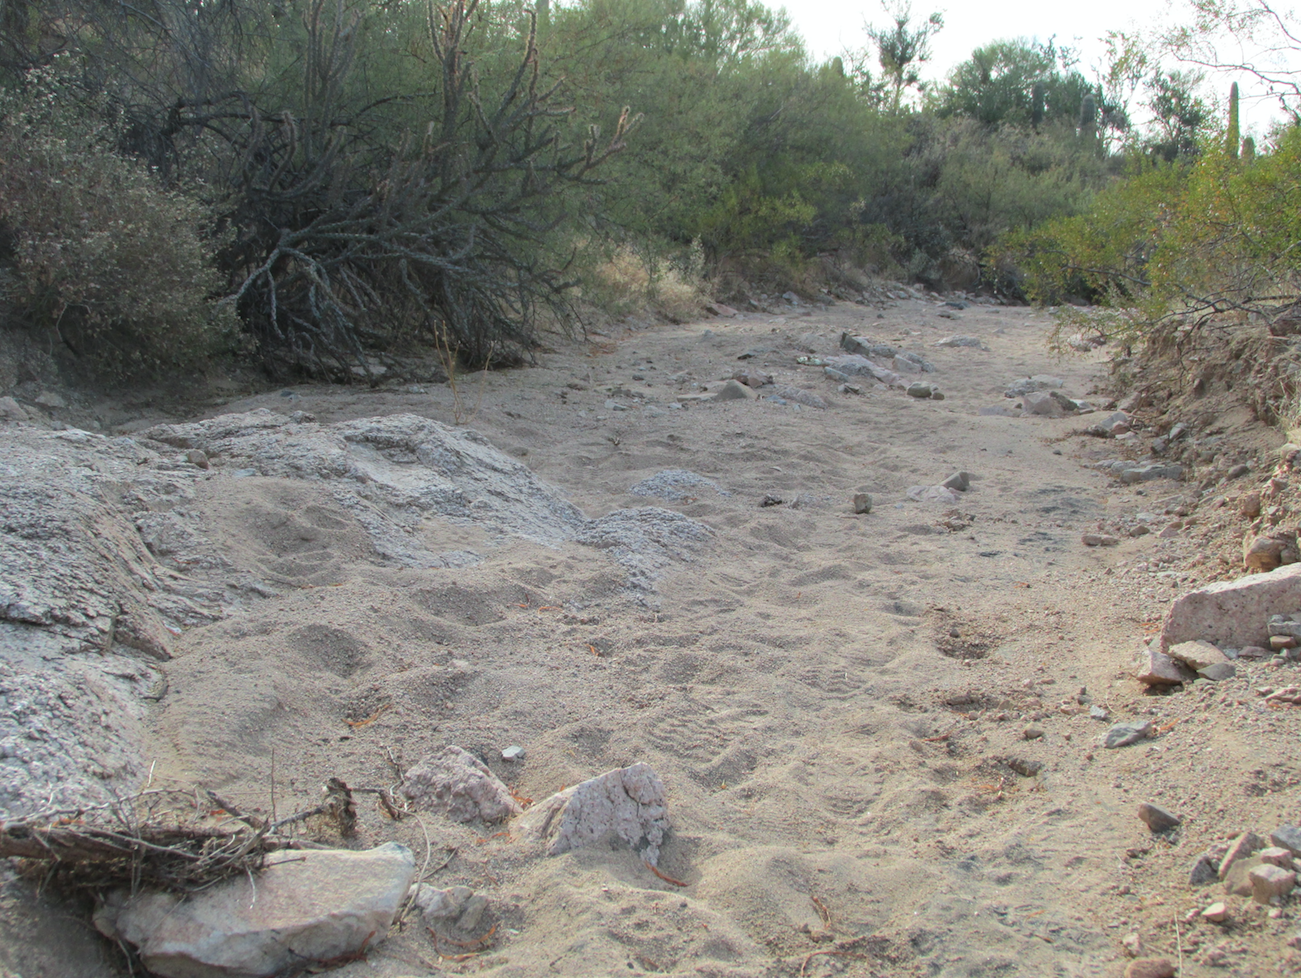 as a massive sluice box. Many of the principles you’re used to when prospecting and mining in waterways, will translate into desert mining. The most important thing to remember is that water is crucial to gold movement. Unlike a running river or creek with highs and lows, desert placers are much different in that gold is moved quickly during a flash flood, leaving gold stranded as opposed to being moved further by continual water flow in a creek.
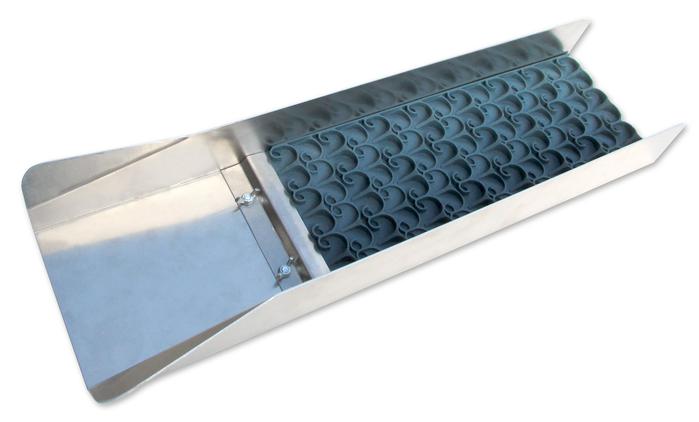
|
Nugget of News Blog |