


Friday, September 30 2022
In an area either rumored or known to hold gold, where should you look first? The creek, the surrounding hills, washouts, or just where? The characteristics of the gold in that area will help you to know where to start. If the gold is flat and pounded, that indicates it’s been in the water a long time. If the gold is coarse and chunky, you know you’re getting closer to the source. When gold is smoother, stop and go back to the coarsest gold and start working upwards until you find the source.
Keep in mind that gold is gold, so there isn’t necessarily a better type of gold. Some is just easier to recover. There are only two types 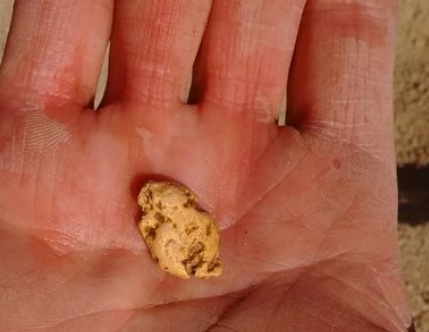 of gold deposits. The first type is “lode” which is simply everything that is still in the matrix and in the ground, and the other is “placer” —or everything else. of gold deposits. The first type is “lode” which is simply everything that is still in the matrix and in the ground, and the other is “placer” —or everything else.Lode deposits refer to gold that is still locked within its original solid rock formation. This formation of gold generally starts as a vein in rock and is formed over millions of years. Since the gold is locked up in rock, and can be mixed with quartz, calcite, pyrite, and other minerals, lode gold usually requires specialized mining techniques to extract. Lode mining takes a lot more equipment and generally a lot more expense and is usually undertaken by large commercial operations instead of the average prospector. Placer gold is the gold that most prospectors are more familiar with. Placer gold isn’t really any different than lode gold. It is simply a concentration of that same gold that has eroded and traveled away from the vein. Since gold is very dense, it will move downhill much slower than the surrounding sediment. It tends to become concentrated on or near the surface of the lode, forming a “residual placer” close to the original bedrock exposure. Gold found downhill from the immediate outcrop above the nearest watercourse is called an “eluvial placer.” Once it reaches the nearest waterway and is transported by flowing water, the gold now is known as “alluvial placer.” The origin of the dust, flakes and nuggets found by panning and sluicing is usually from a vein up on a nearby mountain. Bench placers were originally stream placers. Benches are simply where the water used to be, maybe even millions of years ago. They are formed by erosion or geological events such as uplifts, earthquakes or plate drops that changed the stream flow. Some of the most profitable mining is performed on benches. Many benches are highly concentrated by the alluvial deposits that still feed them. Stream deposits are the last resting place for gold. Once the gold has been released from the lode, gravity and nature does the rest. And unless gold gets stranded on a bench, it will find its way to the water someday. It may take a million years, but it will get there. When deciding where to begin prospecting, most of the time you’ll want to start panning in a water way, or a wash in the desert where water once flowed. Then let the gold tell you where to go from there. When the gold gets coarse and ragged, start to move up, looking in reverse of how it got to the spot where you found it. In addition to panning and sluicing you may wish to upgrade your mining efforts with a highbanker or power sluice, dredge or trommel. Moving soft soil or river gravel is obviously much easier than breaking rock, but for small scale miners, a rock crusher can pulverize 2 or 3 inch sized rocks into powder in no time. Move more material faster— get more gold! Thursday, September 22 2022
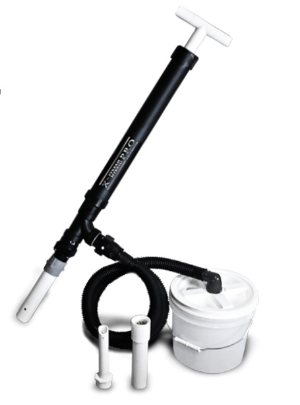
Gold can hide down in the deepest part of a crack or crevice or behind a boulder and often is best reached with a hand dredge, also called a "sucker gun" or "suction gun." This gold prospecting tool is ideal for working below the water line when a motorized dredge cannot be used. It helps you get the gold out of some really tight spaces, a hand dredge is well, handy, when you're prospecting along a river. If you've found a rich spot that is hard to access, these two hand dredges can produce some decent gold! Also check out the many accessories that make your hand dredge even better!
Clamps are not necessary unless you plan to use the system in strong current and want to be extra cautious. For users in deeper water or stronger current, consider wrapping a leash around the lid and tie it off at your waist to prevent the bucket from breaking away.
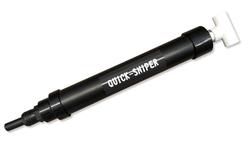
The Quick Sniper is a tool that uses some new ideas to help you collect the hard-to-get gold from heavy sands under boulders, in crevices, and behind obstructions. The “NOZZLE” of the Quick-Sniper is where the magic happens. Inside the nozzle is a short white plastic pipe that extends into the tube. This allows you to pump the handle four or five times before you need to take steps to collect sand and gravel. Instead of pulling the handle and then ejecting the material into a pan or bucket after each pull, the cavity created inside the tube will hold your heavies, allowing water and the lightest material to swirl out and go back into the water before you pull again. Shaking the pump gently will transfer the heaviest of sands and gravel deeper into the cavity. Then, after you have repeated this action a few times, pull off the cap and dump the contents of the pump into your pan or bucket. The flexible tube extending from the end of the nozzle is designed to pull out, allowing you to extend the reach of the tube about 4-5 inches. If this tube is sliding too easily, wrap some electrical tape around the inner end, and it will be more secure within the Quick-Sniper.
|
|
Nugget of News Blog |