


Wednesday, March 29 2023
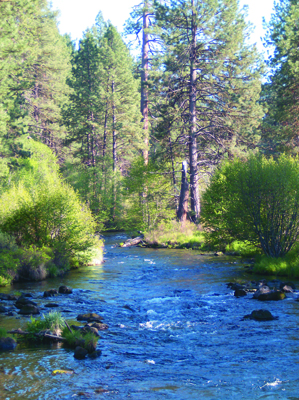
Did you know that “bad” weather can be really GOOD for gold prospectors? Of course no one ever hopes that Mother Nature causes catastrophic loss of life and property, but the ups and downs of weather events in any gold-bearing area are something to take advantage of. Nature can help all of us in our quest for the shiny stuff— especially in light of recent atmospheric rivers causing flooding and lots of snow in California, eastern Idaho, northeast Utah, northwest Colorado, the Cacade Ranges, portions of the northern and central Rockies, and portions of Arizona and Nevada.
How does this help you get more gold? Primarily, multiple weather events cause large amounts of gold to move and replenish areas that already have been worked. And even when the atmospheric rivers die down, the higher than normal snowpack will cause water levels in rivers to flow well into the summer instead of drying up in late spring. Higher water levels extend your mining season, and allow you to run high-production equipment such as highbankers and power sluices. Miners can also work stream bank deposits once the water recedes back to normal flows. Typical winter storms that regularly occur in gold-bearing areas usually do not create enough havoc to force substantial amounts of "new" gold into movement. However, when Mother Nature really goes to work as we’ve seen lately, a great deal of gold can be set free, creating a bonanza for gold hunters. Gold veins that have been hidden for decades suddenly can be exposed. Floods can also sweep gold out of abandoned mines and wash it downriver. Known gold digs can be washed out, trees uprooted, and the landscape eroded— all pluses for prospectors! When tons of rock, cobble, and boulders are swept downstream along bedrock during a huge storm, quite a bit of destruction occurs. Plants, weeds, and trees that normally grow along the river and gravel bars are washed away. And when a major storm or flood tears up large portions of a streambed, a fair amount of this newly-released gold, because of its weight, will be deposited along the riverbed and settle into cracks and crevices (hand dredges are an ideal tool in this situation).
Monday, March 01 2021
A gold pan is the simplest and most basic prospecting tool and is one of the oldest types of gold concentrating equipment. Plastic pans are recommended over the steel pans used by the 49ers. Plastic is light weight, so when you add water, dirt, and gravel to your pan, your arms won't get as tired compared to using a steel pan. And they do not rust or conflict with the use of a magnet. Size, color, and shape are really a matter of personal preference. You might want to have a couple different sizes of gold pans on hand (10 inch, 12 inch, and 14 inch are the most popular). Plastic pans generally come in green, black, and blue. The color doesn't effect performance, but green is the most common. The bright blue cone-shaped batea is the newest type of gold pan to hit the U.S. market. Gold panning kits are often the most economical way to purchase gold pans and classifiers (often called sifting pans) and other small accessories all in one convenient box. The point of panning is to shake the gravels, allowing the gold to settle downward and then to wash the lighter material off the top. When all the lighter material has been removed, only the heavy concentrates will remain in the bottom of the pan, including, hopefully, some gold! With a little practice, anyone can learn to pan for gold. Buying a bag of gold-bearing paydirt to use over and over again for practice in a tub is one way to get good at panning without ever leaving home. Gold panning “how to” steps founds here.
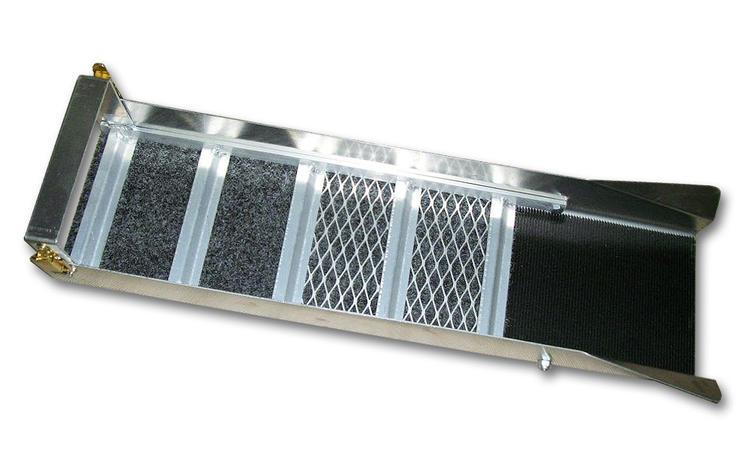
Gold concentrations are spotty, even in known gold-bearing areas, so sample and test often. Be sure to move on with your gold pan and don’t stay in one spot less you have good results. If you find a spot with fairly large amounts of gravel that yields good gold, then it’s time to bring in a sluice box. A sluice is simple to operate and have been used all across the world for thousands of years. After you’ve mastered gold panning and are ready to increase the amount of gravel you can process, a sluice box is your next step up from hand panning. Sluices come in a variety of sizes, most with gold-catching matting in the bottom that you need to clean up at the end of the day. Other models such as the Gold Well Vortex Drop Riffle Sluice, has no matting or carpets and uses vortex technology to catch fine gold.
As with the pan, the real secret of successful prospecting is not in operating the equipment, but in the skill of finding those natural gold catches. Learning to read the river or stream and recognize the places where gold might accumulate and then sampling those places to see if you are correct is the best technique. Inside bends, behind boulders or bedrock outcrops, and inches above the stream flow are all good places that you might sample, but there are plenty of other possibilities as well. The sluice and the gold pan may be among the most basic prospecting tools, but they are tried and true ways of finding some good gold! Monday, December 23 2019
Did you know that “bad” weather can be a plus for prospectors? No one ever hopes that Mother Nature causes catastrophic loss of life and property, but the ups and downs of weather events in any gold-bearing area are something to take advantage of. Nature can help all of us in our quest for the shiny stuff! Typical winter storms usually do not create enough havoc to force substantial amounts of "new" gold into movement. However, when Mother Nature really goes to work over a “bad” winter or for an extended period of time, a great deal of gold can be set free, creating a bonanza for gold hunters in spring and summer. Gold veins that have been hidden for decades suddenly can be exposed. Floods can also sweep gold out of abandoned mines and wash it downriver. Known gold digs can be washed out, trees uprooted, and the landscape eroded. Benched gold deposits can be released and transported back into running streams. If you’re in an area that experiences high-water events, get out and keep an eye on the water flow so you can try to figure out where the gold actually drops out. Watch the flow lines around boulders and trees. Watch where the flows slow down. The rule of thumb — gold is in the inside bend where water is slowest — is a rule of thumb, but not always 100% accurate. On the flip side, if drought conditions prevailed last fall and continue this winter, adequate water levels needed for panning and sluicing may be difficult to find. By knowing this ahead of time, you won’t waste your time. You can plan to travel to better areas in the coming months. Water isn’t the only force that can work in a treasure hunter’s favor. If you are a detectorist, keep an eye on the wind. Downslope winds can strip and scrub away a great deal of surface material. This wind-driven movement of top sands can make an exciting difference— areas that came up empty just last year may suddenly be productive for a metal detector! Whether you’re in the midwest, southeast, or way out west, water table elevations and annual precipitation can have a significant impact on the amount of gold exposed in waterways, which can affect the probability of what you’ll find in your pan. Greater than average winter precipitation may swell waterways, liberating trace gold previously stranded in ground by droughts of late summer and early autumn. Good luck and be safe! Monday, July 30 2018
Places where gold naturally concentrates in an environment of streams and drainages are k When deciding where to start sampling, it’s helpful if you think of a river or stream as a sluice box. Waterways obviously don’t have aluminum riffles and matting, however, they do have natural gold traps that do the same thing that a sluice will do— allow gold to settle out of gravels and be caught while the bulk of the sands continue downstream. Heavy material such as gold doesn’t get spread along evenly, it is most likely caught in certain areas. The downstream parts of inside bends in a stream are favorable places to look for pay streaks. Just how good depends on how sharp the bend in the stream actually is. Usually the sharper the bend, the better the pay streak. If a tributary is known to have coarse gold, look at the intersection of the tributary and the main channel. Behind an obstruction (large boulder, an island, or an outcrop of bedrock) is another good place to look for a pay streak. Boulders and other obstructions can create turbulence where ordinarily smooth flowing water turns into fast flowing whitewater. It is between the fast white water and the quiet dark water that gold drops out. The coarsest gold tends to be found on the outer parts of the pay streak, and the finer-sized gold is on the inner part of the pay streak. When you are working, if it seems as if the streak is petering out as you go toward the middle of the water flow because you are finding little gold, this region of the pay streak is often where the biggest number of nuggets are most likely to occur. Once you know where paystreaks form, you might wonder if they are more likely found on bedrock or in gravels. They are nearly always found on bedrock or some sort of false bedrock. False bedrock might include caliche, a clay layer, or just a well-packed hard pan. You may just get lucky and hit something great with your first shovel of dirt, but more likely you’ll need to test a few different places. Even very experienced prospectors need to keep testing to find those hotspots and paystreaks. Good luck and keep sampling! Friday, December 29 2017
Given a choice, most miners prefer using water to wash and run material, but in some dry, remote areas that Clay is generally known as a great gold robber, making clay-bound gravels the biggest difficulty to overcome. In most of the placers directly derived from weathering lode deposits, the placers are in ravines, gullies and hillsides with sometimes very little gravels and mostly decomposed fragment of rock and fine silt from the decomposing host rock. Host rock containing a lot of feldspars are most problematic. As feldspar breaks down, it creates some difficult clays and silts that bind fine gold to small rocks and sand with the clay and silt particles forming larger clods. Loamy or sandy conditions are much easier to process with a drywasher than clay-bound material due to the absence of clods and clumps. But if dirt clods are giving you grief, break them down with a large hammer on a canvas tarp, or use a mortar and pestle (dolly pot). Once you are set up to run material, process in short runs before cleaning out the riffle tray (perhaps after every three 5-gallon buckets). Frequent clean ups minimize the amount of fine gold that may creep or walk down the riffle tray with the tailings. This method uses your dry washer as a form of a classifier to screen off larger material while getting rid of much of the fine silt and lighter weight material. Re-running tailings can aid in the recovery of lost gold— especially small gold dust and flakes. The second pass through is usually much quicker than the first time because the material has already been classified. With some placers, especially flat, fine gold, rerunning material can be very lucrative. In places where gold is more coarse and angular, very little gold will like be recovered by running the tailings a second time. You may want to experiment with adding a second layer of cloth to a portion of the riffle tray. Doing so reduces airflow by almost half in that section. In addition to the riffle tray, the void under the riffle tray can collect a sizable amount of really fine gold mixed in with fine silt. No doubt there are going to be losses of gold when using a drywasher to recover fine gold (20 minus mesh down into the 200 minus gold), but the end goal should be to limit those losses as much as possible and these tips should help. Good luck! Learn more about Gold Buddy drywashers here. Nugget of News Blog Saturday, December 02 2017
You might have heard the term “flood plain gold” and are wondering what it really means. A very simple definition is “fine-sized gold flakes carried or redistributed by flood waters and deposited on gravel bars as the flood waters recede.” When this “redistribution” occurs, it is usually after heavy winter storms that churned up rivers enough to turn part of the bedload over and move the river bar gravels from one place to another. Within these gravels is fine gold that was previously deposited there. When waterways flow way up and above their normal banks, they generally drop the heavier gold in the front of the bar, and as pressure decreases, the finer gold starts dropping into the mixed gravel. Over time, some of this finer gold will work its way down to bedrock, but generally it stays on the move.
How did the gold get there in the first place? There are many classifications of placer deposits, and their definitions can provide the answer. Among the most well-known is stream placers. Streams carry gold from eroded veins and concentrate them in various ways. Modern streams refer to present-day gold-bearing waterways that are the most common sources of gold for today’s prospectors. Tertiary and intervolcanic channels are rivers buried from mud and volcanic flows that existed prior to our modern-day waterways. High benches were created as rivers cut their way deeper into the bedrock and could be located hundreds of feet above today’s modern rivers. Desert placers are generally the result of torrential flash flooding and not a constant water flow. Glacial stream deposits are created by melting glaciers that can concentrate gold if the water flow is sufficient. Marine or beach deposits can come from wave action against cliffs, from off-shore currents bringing in gold-bearing material from under the ocean, or even from gold-bearing streams that flowed into the beach area eons ago. Since there is a strong possibility that gold can get moved around during storms, it’s now important to know WHERE to find this “dropped out” gold. The secret is to find that drop point and to capitalize on its accumulation. Fine gold looks fantastic in a pan or box, but its weight can be deceivingly light. It takes a lot of fine gold to be equal to a larger piece and to have enough weight to make the recovery effort worthwhile. Some of the best areas to look for flood plain gold are where the stream or river widens out, or levels out, or changes direction. The inside of a bend is good. Rocks and weeds and small shrubs are also potentially good collection spots. When checking out collection spots, be extra careful. Calm water on the surface can hide swift currents underneath. Keep in mind that the effects of heavy winter rains and snow will not be the same on all waterways. Redistribution might occur to a larger degree on larger rivers. Or it could be the opposite where you live and prospect. No one hopes for an especially “bad winter,” but if Mother Nature makes it so, this information could be the silver lining— a way to turn lemons into lemonade come spring when you can get out and take advantage of any gold redistribution that occurs. Good luck and be safe! Nugget of News Blog Tuesday, November 01 2016
Researching and exploring new areas in which to prospect for gold, gems, or whatever you are seeking can be a lot of work, but the process can go much quicker and easier when you know where to start. If the weather where you live is keeping you indoors much of the time this winter, use your downtime wisely by researching and planning for next spring and summer. But don’t rely on just one source of information. Confirm it through several sources. It’s not that you don’t trust Uncle Joe or a “friend of a friend” tip, but facts can be distorted or forgotten over time and that “secret” nugget patch found 30 years ago just might not t The best kind of research brings together different forms of info from a multitude of sources. It is the info gleaned from COMBINED sources that can help you to determine the best possible place to locate precious metal or gems. The more info you can lay your hands on, the better. Consider these resources: Old mining district reports and mining history books. Most western states have some form of mining and geology agency, although they all have different names depending on the state. Find out what information is publicly available at the agencies located in the area you will want to prospect. Old history books can be more help than any state agency because they were written by folks with ties to the area they wrote about. That means they often include valuable information on old mining discoveries or operations that didn’t make it into a government report. Topographic maps. Many old mining areas are shown on topo maps, but usually not on the newer versions, so try and find older topo maps. Many of the newer versions may have old mines removed as a way for the government to “keep the general public safe” by not advertising the whereabouts of the old and “dangerous” mine shafts. Aerial photos. Google Earth is amazing in its quality and detail of photos. Many times you can see individual trees, hiking trails, rock outcrops and even hand-stacked piles of rocks left behind by old-timers. Sometimes larger features and patterns (areas where miners removed a lot of brush, for example) cannot be seen from ground level, but are obvious from far up in the sky. This is also a good way to get an idea of the condition of the roads in the area so you’ll know in advance which look to be commonly traveled. Google Earth ties in with GPS, too. You can review the photos, check them against maps, and get the GPS coordinates of the precise location you want to visit. No more guessing if you have arrived! You will know for sure with GPS that you are in the right spot. Reference libraries. The librarians at state mining divisions and university libraries are generally very friendly and helpful. These libraries are open to the public, so don’t feel shy about requesting help. Any university with a good-sized geology or mining program should have quite a few geologic reference resources including old reports, magazines on the mining industry, thesis reports by graduate students, and even reports by engineers and geologists who were on site at the big operating gold mines in the late 1800s. Many of the old books and reports found in the university libraries will be out of print and cannot be purchased anywhere, so be sure to make photocopies of any documents you need while you are onsite. Many prospectors are discouraged by the amount of work and time that can be involved in researching new areas, but when you find a new spot with good gold, it will be well worth your time and effort! Monday, September 01 2014
In the spring of 1859, flakes of gold were found in Clear Creek, a tributary of the South Platte River in north central Colorado. Some prospectors were happy finding rich gold dust, but John Gregory w Within two months of Gregory’s initial gold discovery, 900 fortune-seekers were living in log shanties and tents. By the following summer, the population had swollen to 10,000. In no time, businesses and mills were thriving and the area became the leading mining center in the Kansas Territory. At this time, Colorado wasn’t yet a state, but its prominent place in mining history was already secured. Between 1859 and 1918 (considered by the National Register of Historical Places to be the area’s “period of significance”), the total gold output was $83,364,157! Most of this was in the form of placer gold, which was extracted with pans and sluices. This “easy” gold played out within the first five years of discovery, and by the end of 1863, most work had shifted to hard rock mining. The promise of riches continues to lure people to Central City today, but it’s not so much to find gold— but to gamble. Limited stakes gaming was legalized in 1991, and has made this area an important destination once again. Gambling was big business here in the 1880s, drawing the likes of Doc Holliday, and even Soapy Smith all the way from Alaska. The downtown core is now a National Historic District, and casinos reside in many of the restored historic buildings. Much of the beautiful and original woodwork, ceilings, and ornate furnishings date back to the 1870s. A scenic loop drive in the hills above the town is the place to find gold rush cemeteries, abandoned mines, headframes, and many other mining relics. Take a Walk The best way to learn more about Central City’s gold rush and admire its architecture at the same time is to stop at the Visitor Center on Eureka Street for a walking tour map. Choose from several self-guided walking tours, depending on your interests. Many of the town’s most magnificent buildings are in downtown, whereas Victorian residences are located outside of the business district. No matter how much ground you want to cover on foot, keep in mind you’re above 8,000 feet in elevation here, so pace yourself. Some buildings are open for guided tours (admission charged) but even if you don’t peek inside, you’ll get a good sense of the town’s history right from the street. If you want to shake hands with one-armed bandits or play poker at any time during your walk, you’ll find a chance to meet Lady Luck every step of the way.
In April of 1873, President Ulysses S. Grant came to see his friend Henry Teller. To impress the president, mine owners decided to lay 26 ingots of solid silver to make a path to the entrance to the Teller House so President Grant wouldn’t have to dirty his boots when he stepped from his carriage. Those wealthy citizens also had an ulterior political motive. At the time, Congress was debating whether gold or silver should back the dollar. Legend has it that Grant became angry when he saw the silver bars and walked up the boardwalk instead of on the silver path so as not to show favoritism. As we know, gold eventually won. The grand opening of the Opera House in 1878 (next door to the Teller House Hotel) started a tradition of community theatre, ranging from opera to vaudeville. Buffalo Bill Cody performed here as well as P. T. Barnum’s circus. The Opera House is known for its elaborately frescoed ceiling and perfect acoustics. In addition to Central City’s very popular Opera Festival held each summer, performances are held year round in this beautifully restored 550-seat theatre. The Opera Association also owns the Williams Stables building on Eureka Street. Initially constructed in 1876 for the use of Teller House guests, the building was purchased a few years later by Sheriff Dick Williams and his son. It was from here that a Stanley Steamer automobile could be had for hire— quite an achievement back in the day! Many of the Main Street establishments are identified by “blocks” and named for their original builders. In addition to the Teller House Hotel, Henry Teller also built the Teller Block for $6,000 in 1874. The upper floor was purchased a few years later by the Independent Order of Odd Fellows, which retained ownership until the 1990s. The Mullen Block was completed in 1874 by Thomas Mullen. Originally a drug store and clothing store, the Elks Lodge bought the building in 1902. The Harris Block was built in 1875 by Robert Harris and was home to the New York Store Mercantile that sold dry goods, clothing, and furnishings. Gold in Them Thar Hills The scenic forested hills above town offer evidence of the thousands of mining claims that placed Central City and the surrounding area in the history books. When you’re ready to take a short loop drive, the helpful staff at the Visitor Center will point you in the right direction. The route is mostly a well-maintained dirt road that takes you past headframes, abandoned mines, and sites of once thriving communities. Nevadaville is one such mining camp that 1,200 gold seekers used to call home. Along the route you’ll see the Coeur d’Alene Mine. Originally opened by Robert Cameron in 1894, the shaft reaches some 700 feet into the depths of Gunnell Hill. Records indicated that in 1915 this mine employed nine men who earned from $3-$4 per day. You’ll also see the shaft house of the Boodle Mill. Because of the serious safety hazard posed by abandoned mines, trespassing laws are strictly enforced. Although tempting to explore, keep away from old mines and tailings to avoid accidents.
The loop drive also takes you through the “cemetery district.” Many stories are told through the memorials and headstones. Harsh weather, less-than-clean water, mining accidents, and few physicians were the norm during the gold rush. So were epidemics of scarlet fever, diphtheria, and the Spanish flu. Sadly, you’ll notice that a large number of children are interred within the cemetery fences. When you visit, please remember these sites are historical grounds, but are also still in use today. The Gilpin County Historical Society also holds an annual “Cemetery Crawl.” "Oh My Gawd Road" After getting your fill of gold rush history and gambling, a popular route leading out of Central City to Idaho Springs takes about 30 minutes. It isn’t quite as bad as its moniker, but it’s not for the faint of heart either. The “Oh My Gawd” Road (CR 279) is more dirt than pavement and wouldn’t be wise for drivers who don’t like narrow, twisty roads, but the mountain views make it worth it. Along the bumpy route you’ll pass the famous “Glory Hole” mine workings, drive through Russell Gulch, and see many more mining relics that attest to “The Richest Square Mile on Earth” in days gone by. IF YOU GO: Central City is located in the Rocky Mountains, only 35 miles west of Denver. With the newly opened, Central City Parkway, visitors can reach Central City 12 minutes after exiting off of I-70 at exit 243. The Central City Visitors Center is located at 103 Eureka Street, at the northern end of Main Street in the old Wells Fargo Building. Articles and photos by Denise Seith. This article first appeared in the May 2014 issue of Gold Prospectors Magazine, published by the Gold Prospectors Association of America (GPAA). Tuesday, April 01 2014
Typical winter storms that regularly occur in gold country usually do not create enough havoc to force substantial amounts of "new" gold into movement. However, when major flooding like what happened in Colorado in September of 2013 is followed by a “bad” winter, a great deal of gold can be set free. When tons of rock, cobble, and boulders are swept downstream along bedrock during a huge storm, quite a bit of destruction occurs. Plants, weeds, and trees that normally grow along the river and gravel bars are washed away. And when a major storm or flood tears up large portions of a streambed, a fair amount of this newly-released gold, because of its weight, will be deposited along the riverbed and settle into cracks and crevices. Saturday, March 01 2014
Natural Factors to Consider Before Digging for Gold:
Sunday, October 27 2013
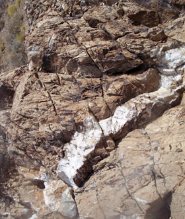
There are basically two kinds of potholes in bedrock channels -- vertical and lateral. Vertical potholes formed on rock surfaces that were at one time part of the channel's rock floor. These potholes are now exposed because that portion of the channel has been raised above the active river or is just below the surface, making them pretty easy for you to spot. Lateral potholes are cut into the rocky sides of channels or into sides of rocks that stuck out of the channel as mini-islands. Lateral potholes formed near the river's surface, where rock, water and air meet, instead of at the river bottom.
In the same way that tree roots, huge logs, and big boulders can catch gold as it is moved downstream by fast-moving water, rock pot holes are natural gold catchers, too. Rocks and debris can settle in the pot holes and act as a "cap" for bits of gold that are also washed into the depression. Often the cap will completely hide gold that is underneath it... that is until some lucky prospector like you comes along, knowing where to look, and moves the cap out of the way to expose the gold. Eureka! Monday, January 07 2013
Following the discovery of gold in Coloma, California on January 24, 1848, boomtowns sprang up quicker than weeds. Just eight miles away, Old Dry Diggins was one such tent-filled mining camp that took root. So named because miners had to move cartloads of dry soil to running water in order to separate out the gold, the population quickly swelled from hundreds of gold seekers to thousands. As to be expected, things got a little lawless and wild, and the name changed to Hangtown after numerous hangings took place in quick succession. Today, we know this historic gold rush town as Placerville, California.
 Most early prospectors got the gold by panning and sluicing. Gold was easier to see and easier to recover that way. Eventually, though, the “easy money” ran out and more and more small mining companies and individuals turned to hard rock mining. Take a self-guided walking tour of the Gold Bug Mine in Placerville’s Gold Bug Park, and you’ll see how these miners dug drifts (horizontal tunnels) into hillsides to follow the veins of quartz and gold. 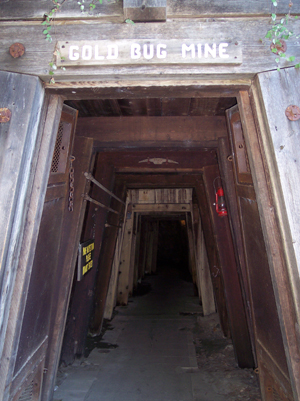 The Gold Bug Mine (originally the Hattie Mine) is a typical hard rock mine found in the Mother Lode. If you haven’t had the opportunity to safely explore an underground mine, or want to introduce your kids to a little fun and history, Gold Bug Park is ideal. Not only can you can go underground, but you can visit a stamp mill and blacksmith shop, have a picnic, and do a little hiking, too. When you buy your tour ticket, you’ll get a hard hat to wear and a hand-held audio wand. As you make your way through the mine, the voice of an old-timer tells the tales of the Gold Bug and the California Gold Rush. Article continued here... |
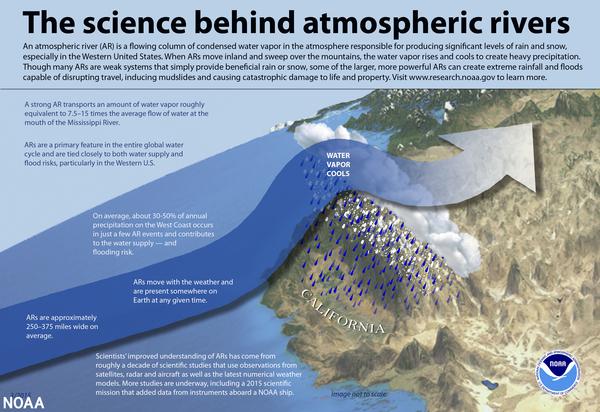 Atmospheric rivers are large, narrow sections of the earth's atmosphere that carry moisture from the earth's tropics near the equator to the poles. On average, the earth has four to five active atmospheric rivers at any time. A vast majority of atmospheric rivers happen in the fall and winter. The northern Pacific Coast receives the bulk of activity in the fall, and the California coast receives more in the winter. Since December 2022, the U.S. West has been slammed with back-to-back-to-back atmospheric rivers. These events provide as much as half of the region’s annual precipitation, bringing much-needed water to parched lands and adding to the snowpack in the high mountains. This year’s storms have done a lot to restore the landscape drought and is “greening up” the landscape and refilling many smaller reservoirs.
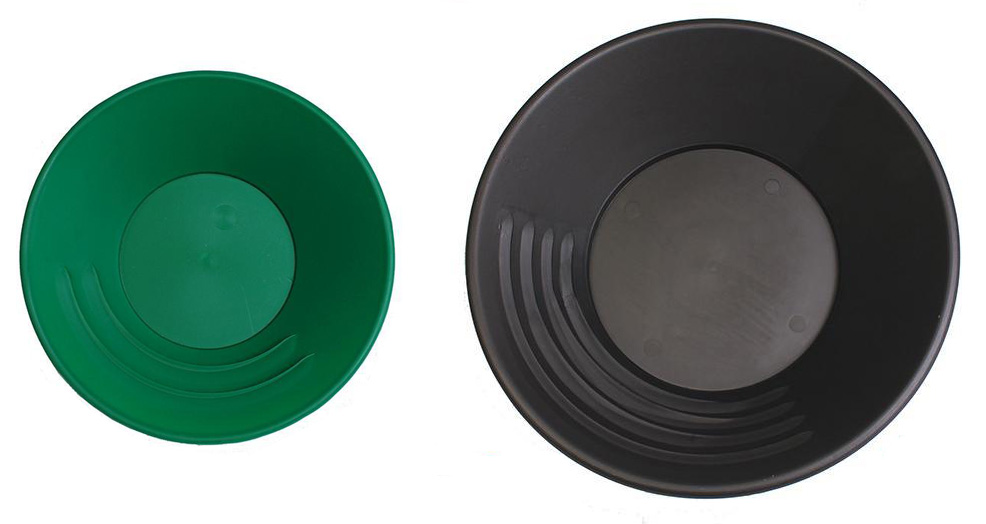

 nown as paystreaks. No matter if you are panning, sluicing, dry washing, or metal detecting, in many ways your success at gold prospecting comes down to locating these elusive natural pay streak concentrations. Keep in mind that most gold paystreak formations occur during times of flooding and that many factors affect how gold gets deposited. Perhaps the biggest factor is that gold is dense and is more than 19 times heavier than water. The denser an object, the more easily it will resist the flow of moving water. That means it takes a very strong and fast moving water flow to move along a nugget the size of a pea.
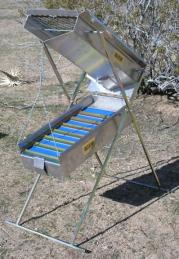

 urn out to be quite so secret any more.
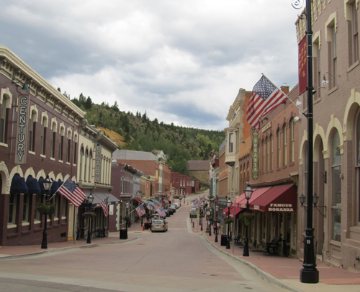 as determined to find the source. For months, the Georgia native followed North Clear Creek upstream from the present-day city of Golden, and on May 6, 1859, made the first lode discovery in the Rockies! Gregory sold his two claims for $21,000 a few months later and left the area, but his name carries on. “Gregory Gulch” is located between the towns of Central City and Black Hawk. The Gregory Mining District encompasses these towns plus several other mining camps, and as a whole, this area is referred to as "The Richest Square Mile On Earth.” Central City takes it name from being “central” to all the mining activity.
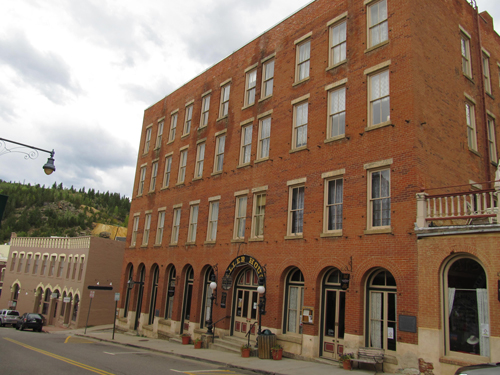 One of the most notable buildings in downtown is the 150-room Teller House Hotel. Located on the corner of Eureka and Pine Streets, it was built in 1872 at a cost of $87,000, plus another $20,000 to furnish. From its non-descript exterior, you’d never believe that the Teller House was once considered to be the most elegant hotel between Chicago and San Francisco. Financed largely by Henry Teller, who became the first senator from Colorado and later, Secretary of the Interior, it’s no longer used as a hotel but is the center for opera-related activities (Central City Opera House is next door).
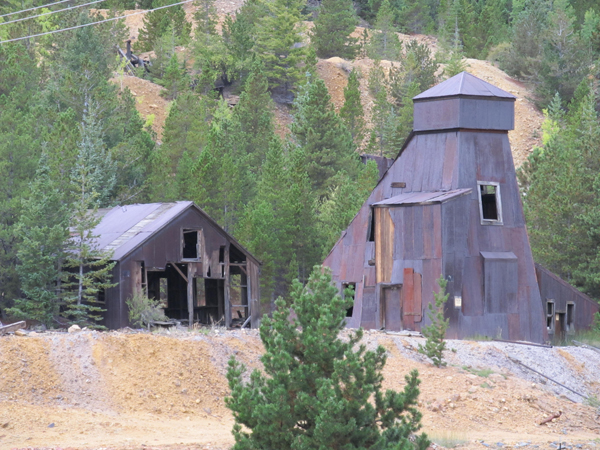 Known for their excellent stonework, the rock retaining walls visible in various places along the route were built by a very large population of Cornish miners. The walls were part of the former Gilpin Tramway, a 26-mile narrow gauge railroad that once looped around the gulches and through the surrounding communities. Sidings went to many of the major mines. Most of the retaining walls don’t use mortar, and were instead constructed using a dry-stack method. After more than a century, most of the rockwork is still holding up— no maintenance required.
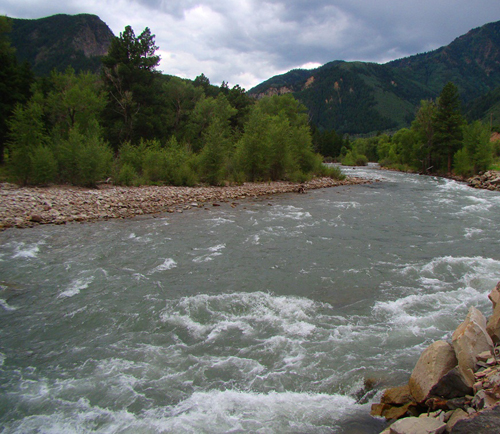
 Some say that "gold is where you find it" and while that may be true, once you arrive at a known gold-bearing location, how do you decide where to dig first? Successful prospectors follow different methods, so there is no single "right" way, but no matter if you are sluicing, dry washing, or metal detecting, if you first consider the "lay of the land" you can better pinpoint a place to start.
 Man-Made Factors to Consider Before Digging for Gold:
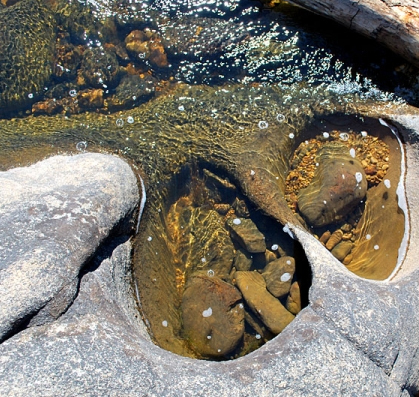 When you think about pot holes, you probably picture annoying driving hazards in the middle of the road that you try to avoid at all costs. That hole in the asphalt can cause a flat tire and help throw your car's alignment out of whack! But a pot hole in a rock that's located in a gold-bearing stream or river is something you DON'T want to steer clear of the next time you're out prospecting.
|
Nugget of News Blog |