


Sunday, November 20 2016
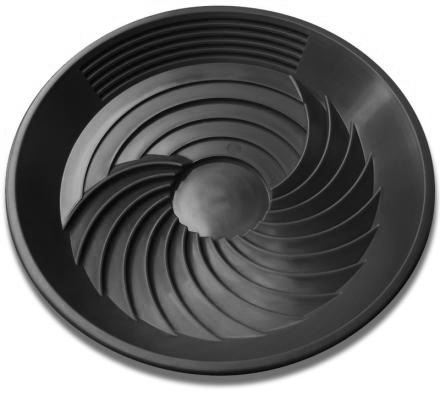
Recently, Gold Prospectors magazine published an article in the November/December 2016 issue about the Turbopan. Read an excerpt of that article below: Turbopan was designed by Kim Hillier, an Australian geologist and prospector with over 20 years experience in "A river is a natural sluice, and because a sluice is an excellent way of recovering gold, I designed the Turbopan to act like a sluice in a pan," explains Mr. Hillier. The pan's riffles act like a circular sluice and were designed to use gravity to accelerate the gold to the bottom of the pan. The bottom well of the Turbo pan is in the center of the pan-- as far away from the lip of the pan as possible, so you don't accidentally lose any of your precious metal. The design of the Turbopan combines the best features of the traditional batea, a deep conical shaped wooden bowl used as far back as the Mayans, and the basic copper pan used in the Klondike Gold Rush. The unique design allows the whole circumference of the pan to eject waste material and many more riffles trap much more gold. This is a huge advantage over traditional pans which tend to concentrate all material on one side of the pan. "The Turbopan is really fast!" says Hillier. "You've got maximum riffles if you're panning out over the front and also you can get the waste out before you start the clean up. It's sort of a bit of a hydrocyclone as well if used to its maximum ability, and its also good for wet sifting through gravels for gems." How to Use the Turbopan: 1. Place your material in the Turbopan. Be careful not to overload it. The pan is meant to hold up to about pounds. With the clean-up riffles facing away from you, submerge the pan into water, and then spin the pan counter-clockwise and then clockwise 180 degrees to allow the water to saturate the materials. TIP: Use a catch tub so you don't lose any gold in a fast-flowing stream! 2. Before panning, use your finger to feel the texture of the material in the bottom of the central trap. Does it feel too tightly compacted? If so, simply shake up the material for better stratification. 3. With your Turbo pan partially submerged, begin moving it in a counter-clockwise circular motion so that the material moves over the circular riffle bed. This action will break up clumps of dirt and prevent compaction. 4. Because gold-bearing black sands are much heavier than dirt and gravel, it will sink and become trapped in the spiral riffle grooves and gravity will move gold into the central trap. The circular motion creates centrifugal force, pushing light sands and clays to the outside of the pan, leaving the heavier black sands and gold in the center of the pan. Alternate between a "centering swirl" to get the gold-bearing heavies to the middle of the pan and the "lights" to the surface, and an "ejection swirl" to get rid of the waste materials. 5. Because the pan is shallow, you'll notice how easily you can clear the small rocks, pebbles and debris from the pan with a single sweep of your hand. 6. When the amount of material remianing in the pan barely covers the central trap, do two or three more clockwise swirls, then about five seconds of vigorous back-to-front and side-to-side motions. 7. Tilt the pan away from you and gently shake it side to side while tilting the pan up at about a 30 degree angle. 8. Pan off any waste until you have only a small amount of concentrates containing gold (about the diameter of a 50 cent piece). 9. Tilt the pan towards you and look for your gold in the bottom of the central trap. 10. If you see gold in the cleanup riffles, don't worry. With a little more practice you'll master your own technique. To watch how-to videos or shop for the Turbopan, click here. Tuesday, November 15 2016
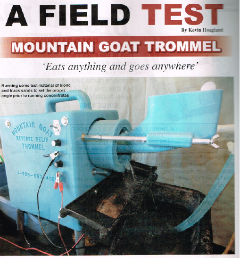
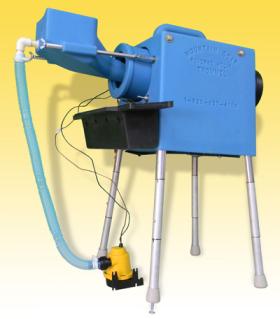
The Mountain Goat Trommel is not new to the prospecting industry by any means, but it has just recently been field tested by Kevin Hoagland, host of the GPAA-produced TV series Gold Trails. Kevin's complete Field Test was published in the November/December 2016 issue of Gold Prospectors magazine. Below is an excerpt or you can Download the complete Mountain Goat Field Test here (6-page .pdf). Invented by the late great Angus Niccolls who started Camel Mining, the Mountain Goat Trommel has a long history of excellent gold recovery and easy of use. It will handle .5 inch minus material with the optimal recovery The Mountain Goat is a variant of the Archimedean Screw, which is a tube surrounding a rotating screw used to pull a column of water up a grade. This makes it possible to easily lift water. In the Mountain Goat, the outer tube is lined with the screw, and as gold-bearing material is stratified by a stream of water and run through the tube, the heavier gold-bearing material is deposited into the reverse screw and brought to the top of the unit. The lighter waste material is continually washed and pushed through the unit into the tailings. In other words, when material enters the hopper, the gold goes one direction and the water goes the other. It’s really no different than huge trommels, except that the Mountain Goat does all of this in a unit that weighs less than 20 pounds, and recirculates about 10 gallons of water all day long. And if set up properly, the manufacturer says it can handle about two yards of material in a long day of running. The Mountain Goat Trommel is cleverly designed. It’s compact and almost completely assembled when you receive it. The carry handle is molded into the unit, making it easy to transport (especially if you are riding a quad or other vehicle). The trommel tube is pre-mounted to the unit with the nugget trap installed, needing no further assembly. The legs are collapsible and can be set to two different heights. Plus, the front legs are further adjustable to allow you to fine tune the unit to the material you’re working. The pump is 12-volt, and the flow rate was chosen to offer the best recovery possible. It is recommended that But before you use it for the first time, or if it has sat unused for a while, be sure to clean the unit with hot water and a little unscented dishwashing soap. Hook up the unit and allow the soapy water to do its job of removing the release agent that comes on just about any product that has been molded. Sponge down all surfaces exposed to water and the outside of the unit, too. This simple cleaning step can prevent gold loss. You might want to clean the machine outdoors as the soap bubbles can go everywhere! As you use the Mountain Goat, continually test the tailings. You should not see any gold. If you do, you may need to increase the angle of the unit by turning the screws on the front legs. It’s a bit of trial and error, just as it is when setting up a sluice in a stream. The Mountain Goat can be paired with the Desert Fox Spiral Wheel for a complete two stage concentrator and final recovery unit. Nugget of News Blog Tuesday, November 01 2016
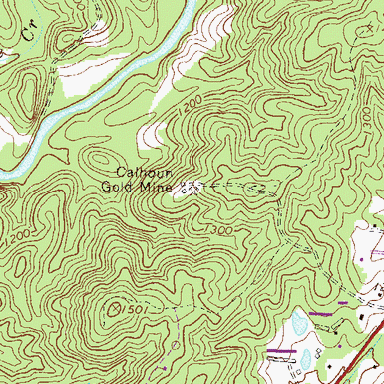
Researching and exploring new areas in which to prospect for gold, gems, or whatever you are seeking can be a lot of work, but the process can go much quicker and easier when you know where to start. If the weather where you live is keeping you indoors much of the time this winter, use your downtime wisely by researching and planning for next spring and summer. But don’t rely on just one source of information. Confirm it through several sources. It’s not that you don’t trust Uncle Joe or a “friend of a friend” tip, but facts can be distorted or forgotten over time and that “secret” nugget patch found 30 years ago just might not t The best kind of research brings together different forms of info from a multitude of sources. It is the info gleaned from COMBINED sources that can help you to determine the best possible place to locate precious metal or gems. The more info you can lay your hands on, the better. Consider these resources: Old mining district reports and mining history books. Most western states have some form of mining and geology agency, although they all have different names depending on the state. Find out what information is publicly available at the agencies located in the area you will want to prospect. Old history books can be more help than any state agency because they were written by folks with ties to the area they wrote about. That means they often include valuable information on old mining discoveries or operations that didn’t make it into a government report. Topographic maps. Many old mining areas are shown on topo maps, but usually not on the newer versions, so try and find older topo maps. Many of the newer versions may have old mines removed as a way for the government to “keep the general public safe” by not advertising the whereabouts of the old and “dangerous” mine shafts. Aerial photos. Google Earth is amazing in its quality and detail of photos. Many times you can see individual trees, hiking trails, rock outcrops and even hand-stacked piles of rocks left behind by old-timers. Sometimes larger features and patterns (areas where miners removed a lot of brush, for example) cannot be seen from ground level, but are obvious from far up in the sky. This is also a good way to get an idea of the condition of the roads in the area so you’ll know in advance which look to be commonly traveled. Google Earth ties in with GPS, too. You can review the photos, check them against maps, and get the GPS coordinates of the precise location you want to visit. No more guessing if you have arrived! You will know for sure with GPS that you are in the right spot. Reference libraries. The librarians at state mining divisions and university libraries are generally very friendly and helpful. These libraries are open to the public, so don’t feel shy about requesting help. Any university with a good-sized geology or mining program should have quite a few geologic reference resources including old reports, magazines on the mining industry, thesis reports by graduate students, and even reports by engineers and geologists who were on site at the big operating gold mines in the late 1800s. Many of the old books and reports found in the university libraries will be out of print and cannot be purchased anywhere, so be sure to make photocopies of any documents you need while you are onsite. Many prospectors are discouraged by the amount of work and time that can be involved in researching new areas, but when you find a new spot with good gold, it will be well worth your time and effort! |
 urn out to be quite so secret any more.
|
Nugget of News Blog |