


Friday, September 29 2023
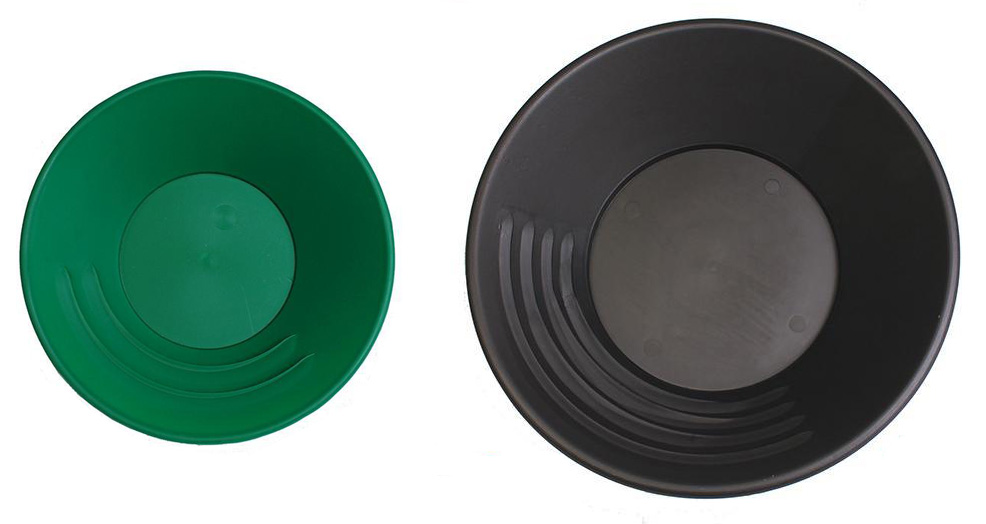
Gold concentrations are spotty, even in known gold-bearing areas, so most prospectors sample and test often using a simple gold pan.
Proper Setup of your sluice is by far the most important aspect of gold separation and recovery. Some common mistakes too watch out for are:
Thursday, April 13 2023
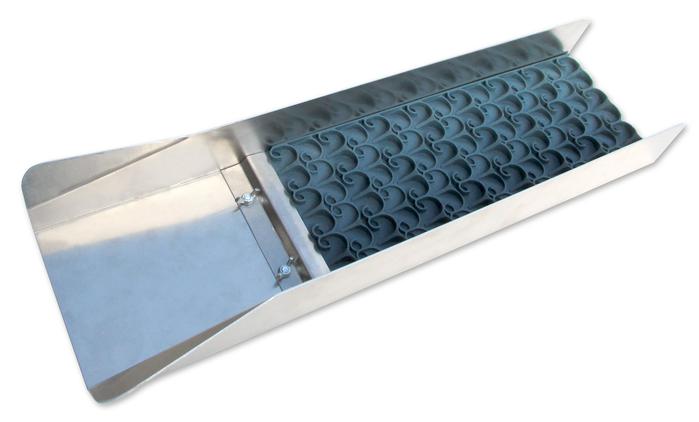
Over the years you may have tried many different types of mats, carpets, riffles, and miners moss, but Dream Mat was inspired solely Mini Dream Mat is ideal for sandy areas and black sands. Great for 1/4"-3/8" screened runs. Catches the gold everyone is missing! Mini Mat is great for that hard to catch gold!
Browse Now — Dream Mats for Stream Sluices, Power Sluices, and Gold Cube. Wednesday, March 29 2023
Did you know that “bad” weather can be really GOOD for gold prospectors? Of course no one ever hopes that Mother Nature causes catastrophic loss of life and property, but the ups and downs of weather events in any gold-bearing area are something to take advantage of. Nature can help all of us in our quest for the shiny stuff— especially in light of recent atmospheric rivers causing flooding and lots of snow in California, eastern Idaho, northeast Utah, northwest Colorado, the Cacade Ranges, portions of the northern and central Rockies, and portions of Arizona and Nevada.
How does this help you get more gold? Primarily, multiple weather events cause large amounts of gold to move and replenish areas that already have been worked. And even when the atmospheric rivers die down, the higher than normal snowpack will cause water levels in rivers to flow well into the summer instead of drying up in late spring. Higher water levels extend your mining season, and allow you to run high-production equipment such as highbankers and power sluices. Miners can also work stream bank deposits once the water recedes back to normal flows. Typical winter storms that regularly occur in gold-bearing areas usually do not create enough havoc to force substantial amounts of "new" gold into movement. However, when Mother Nature really goes to work as we’ve seen lately, a great deal of gold can be set free, creating a bonanza for gold hunters. Gold veins that have been hidden for decades suddenly can be exposed. Floods can also sweep gold out of abandoned mines and wash it downriver. Known gold digs can be washed out, trees uprooted, and the landscape eroded— all pluses for prospectors! When tons of rock, cobble, and boulders are swept downstream along bedrock during a huge storm, quite a bit of destruction occurs. Plants, weeds, and trees that normally grow along the river and gravel bars are washed away. And when a major storm or flood tears up large portions of a streambed, a fair amount of this newly-released gold, because of its weight, will be deposited along the riverbed and settle into cracks and crevices (hand dredges are an ideal tool in this situation).
Monday, February 21 2022
Depending on where you live and where you like to treasure hunt, you might still be buried under feet of snow. Or maybe spring has sprung and temperatures are on the rise there. No matter the weather, you probably have extra time on your hands this time of year, so put that time to good use. Even though you might not have been out in the field for the last few months, you can still be prospecting and getting prepared for a new season of gold hunting! In other words, use your downtime wisely, so you can hit the ground running as soon as Mother Nature allows. Inspect equipment. Did you properly clean and store your sluice and/or highbanker at the end of last season? In advance of heading Prepare your tools. Sharpen digging tools, picks, shovels, chisels and other specialty tools that require sharp edges. Now is also a good time to mark screwdrivers, magnets, crevice tools and other small implements with some bright colored paint. It’s amazing how easily tools can get “lost” in the dirt. A strip of bright yellow or red can help you more easily spot them. Double check the seals on snuffer bottles, hand dredges, and vials to make sure they’re tight. Pack your backpack or tool kit with everything necessary for a full day’s work. Maintain your metal detector. If your metal detector is still under warranty or giving hints of potential issues, the off-season is ideal for sending it to the manufacturer or taking it to an authorized repair shop to be fixed or tuned up. Check your rechargeable battery and make sure it is fully charged. Better yet, purchase a new battery as a back up. It’s also time to dust off the operator manual or search YouTube for “how to” videos pertaining to your brand and model. You’ll likely uncover some helpful tips and tricks, or learn a new recovery method. Is this the year to add a new coil or pinpointer? Now is a good time to consider upgrades and make those purchases earlier than you expect to use them. Do your research. The best kind of research brings together different forms of info from a multitude of sources. It is the info gleaned from combined sources that can help you to determine the best possible place to locate precious metal or gems— old mining district reports, mining history books, topo maps, aerial photos. Consult the Bureau of Land Management's LR2000 searchable database. The legacy system is undergoing upgrades; as the new systems is implemented, information will be easier to find. It can take a lot of time to research new areas, but when you find a new spot with good gold, it will be well worth your time and effort! It’s also a good idea to have alternate sites in mind just in case you cannot access your primary sites due to unforeseen closures.
Friday, October 01 2021
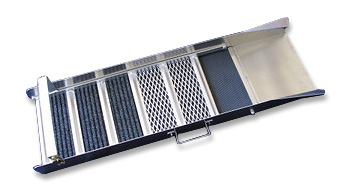
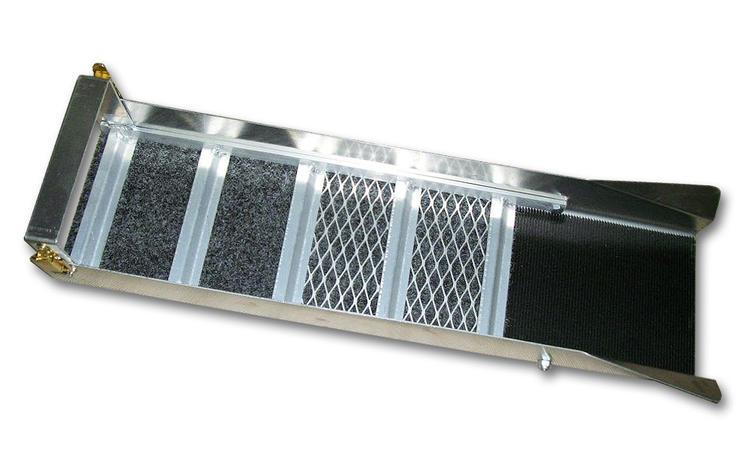
Sluicing is one of the most popular gold-recovery methods, and a sluice box is often a miner’s first purchase after a basic gold pan. There are many options to consider— riffles, matting, brands, and sizes. You might want to stick with traditional z-riffle sluices with ribbed matting and miner’s carpet, try the new mini or vortex Dream Mats without riffles, or a combination of different types of miner’s moss. No matter what you choose or upgrade to, sluicing techniques are fairly straight forward. The three main things to concentrate on for best gold capture are: proper selection and set up, material classification and processing, and monitoring. These three key steps will allow you to maximize gold recovery. Proper Set Up. This is by far the most important aspect of gold separation and recovery and includes angle, horizontal leveling, and water flow. Improper sluice angle is probably the most common error most miners make. The old rule of thumb of setting your sluice to “one inch per foot” is just a starting point and can result in too much water velocity. Too much water leads to improper breakdown and separation of heavy concentrates and material moving through the box too quickly, which can mean loss of fine gold. A Sluice Setter Digital Pitch Gauge can help, and so can focusing on water velocity instead of just the angle. Try the “one second per foot” method. Measure 12 inches down your sluice and mark that spot. As you feed material into your sluice using a side-to-side motion, count “one thousand one.” Your material should be passing the 12 inch mark as you finish that count. If it needs to be faster, increase the rear angle. If it needs to be slower, decrease the rear angle. As material travels down the sluice, be sure you are utilizing the entire capture area. If material is being forced to one side or the other, leaving one side clogged with too much material, while the other side is not processing at all, it could mean the sluice is not properly leveled horizontally. Material Classification and Processing. In order to capture small gold in quantity, finer classification is usually necessary, even though it’ll take more time to do so. Processing speed and the volume of material to put into the sluice (by hand or by scoop) must be matched to the volume and velocity of the water. If too much material is introduced into the flow, the water velocity will slow down causing the sluice to back up and lose gold. Gradually add smaller amounts of material to the flow using a wide scoop. Monitoring Your Sluice. When using stream flows, you are bound by the characteristics of that waterway—water speed, depth, and the ability to change your sluice angle. Mechanical flow is not limited by nature since you can control it. But no matter who is controlling the water (you or Mother Nature) monitor two factors while running gold-bearing material: how the sluice is processing the material, and the capacity of your sluice. How much can the sluice hold before it loses the ability to separate heavy materials and capture gold? If you see movement of heavy material down the sluice or movement of captured gold, it’s time to remove your sluice from the river, clean it, and reset it. When processing difficult material, set up a regular cleaning schedule so you don’t lose gold. Applying these three main techniques while sluicing — proper selection and set up, material classification and processing, and monitoring — will allow you to adapt to changing conditions no matter the type or brand of sluice box you prefer. And remember that old saying "practice makes perfect" — using the same gold-bearing paydirt over and over again means you can learn these techniques and tips much quicker and recover more gold! Monday, March 01 2021
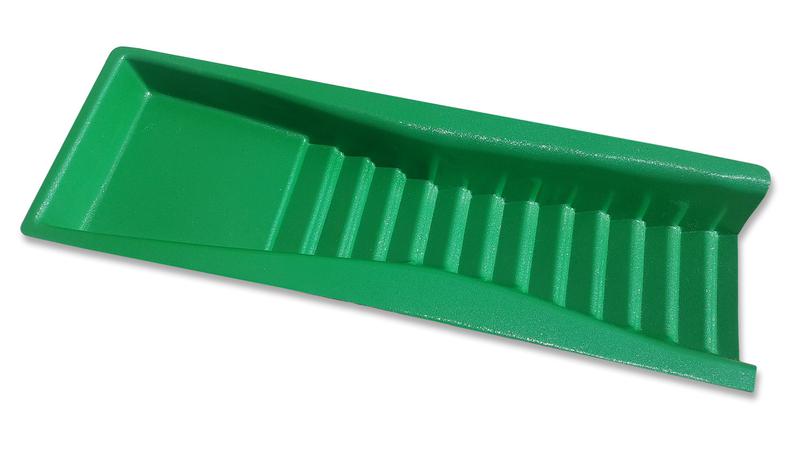
A gold pan is the simplest and most basic prospecting tool and is one of the oldest types of gold concentrating equipment. Plastic pans are recommended over the steel pans used by the 49ers. Plastic is light weight, so when you add water, dirt, and gravel to your pan, your arms won't get as tired compared to using a steel pan. And they do not rust or conflict with the use of a magnet. Size, color, and shape are really a matter of personal preference. You might want to have a couple different sizes of gold pans on hand (10 inch, 12 inch, and 14 inch are the most popular). Plastic pans generally come in green, black, and blue. The color doesn't effect performance, but green is the most common. The bright blue cone-shaped batea is the newest type of gold pan to hit the U.S. market. Gold panning kits are often the most economical way to purchase gold pans and classifiers (often called sifting pans) and other small accessories all in one convenient box. The point of panning is to shake the gravels, allowing the gold to settle downward and then to wash the lighter material off the top. When all the lighter material has been removed, only the heavy concentrates will remain in the bottom of the pan, including, hopefully, some gold! With a little practice, anyone can learn to pan for gold. Buying a bag of gold-bearing paydirt to use over and over again for practice in a tub is one way to get good at panning without ever leaving home. Gold panning “how to” steps founds here.
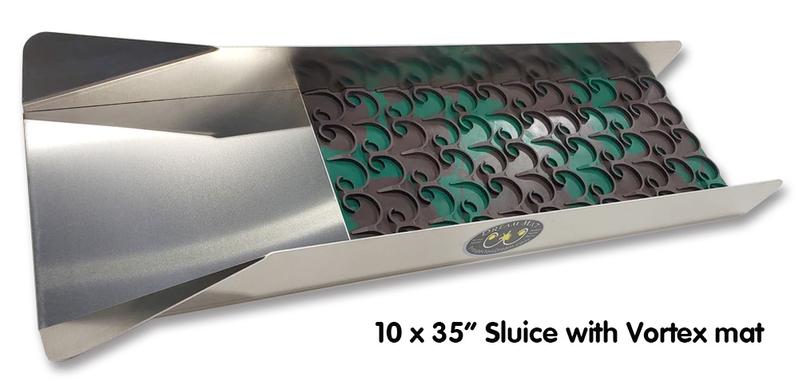
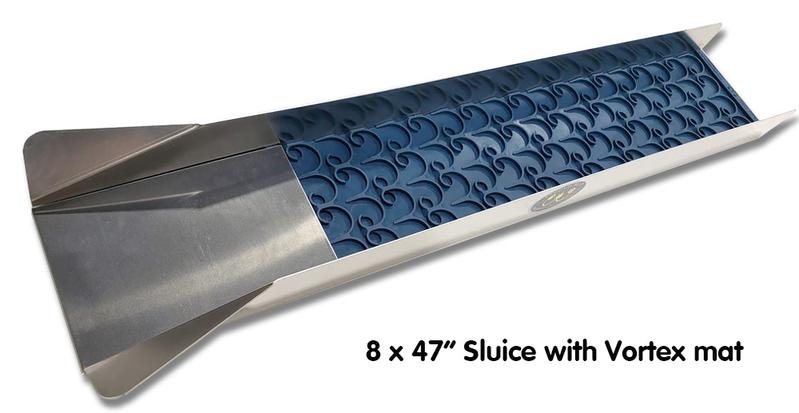
Gold concentrations are spotty, even in known gold-bearing areas, so sample and test often. Be sure to move on with your gold pan and don’t stay in one spot less you have good results. If you find a spot with fairly large amounts of gravel that yields good gold, then it’s time to bring in a sluice box. A sluice is simple to operate and have been used all across the world for thousands of years. After you’ve mastered gold panning and are ready to increase the amount of gravel you can process, a sluice box is your next step up from hand panning. Sluices come in a variety of sizes, most with gold-catching matting in the bottom that you need to clean up at the end of the day. Other models such as the Gold Well Vortex Drop Riffle Sluice, has no matting or carpets and uses vortex technology to catch fine gold.
As with the pan, the real secret of successful prospecting is not in operating the equipment, but in the skill of finding those natural gold catches. Learning to read the river or stream and recognize the places where gold might accumulate and then sampling those places to see if you are correct is the best technique. Inside bends, behind boulders or bedrock outcrops, and inches above the stream flow are all good places that you might sample, but there are plenty of other possibilities as well. The sluice and the gold pan may be among the most basic prospecting tools, but they are tried and true ways of finding some good gold! Monday, November 16 2020
The use of water for grinding and milling has been in practice for thousands of years. From simple water wheels to inventors such as Water Flow. The easiest example of how water dynamics affect gold is the classic inside bend in a waterway. When stream flow is straight and velocities are at their highest, gold will be suspended in the flow. As a bend in the stream causes flow to begin slowing down, the heaviest gold begins to drop out because the water no longer has enough velocity to suspend the material. The stream continues to lose power as the bend length increases and smaller and smaller gold continues to be deposited until there is no longer any in suspension, or the remaining water flow and speed cannot carry it farther downstream. Water velocity and flow affect attempts at recovery in all capture devices in exactly the same way. Each piece of gold in classified material requires a certain flow and length of time to separate, drop out, and be captured based solely on its relative size and weight. If the velocity and flow are too great, the gold will remain suspended and will exit the machine regardless of machine length or method of recovery. This is why some miners are lured into a false sense of security just by using longer sluices. Improper water depth in the sluice can create additional problems in recovery. Methods of material collection have much less effect if the gold is suspended in the upper part of the water flow. Most sluices provide little or no material agitation to break up the classified material and provide the necessary change in flow that facilitates gold separation. Lack of agitation allows smaller pieces to be carried through the equipment. Classification. There is a direct relationship between material classification and water speed, which is often overlooked. It is common to classify for ease and speed of filling buckets rather than size of gold being targeted. Larger classification requires increased water speed to push the material through most recovery systems. The trade-off is forfeiting recovery of finer gold by increasing the length of drop time. This reduces the number of gold capture attempts and even machine effectiveness by having concentrations of larger material wedging into riffles, drops, etc. Running dry material requires the sluice to liquefy the material while it is passing through. Gold particles will suspend in the dry material, reducing the chance of capture. Many miners use a scoop and drop their material into the machine in large clumps. This also allows particles to suspend instead of being processed. Material should always be wet prior to processing, and material should be cast (sprinkled) side to side across the machine when using a scoop. Riffles. Some riffle designs are actually not that ideal for gold recovery. Some sluice riffles are evenly spaced, making them too far apart to impart the “vortex” or reverse underflow. What actually happens is an up-and-down wave motion as the water travels down the sluice. The only “action” imparted is the same negative flow that happens when water flows over a rock or some other obstacle in a stream. Material suspended at the bottom of the flow is deposited as the water climbs over the riffle and slows. Material that is heavy enough and can no longer be suspended drops. The rest of the material remains in the flow and continues to be carried down (and possibly out of) the sluice. Flare. Most modern riffle sluices (standard and drop designs) are susceptible to improper setup angle, which can either clog the machine with material or blow it out completely. Either problem results in the loss of gold. Another big mistake in sluice design and operation is the “V” fallacy. The idea that channeling your water towards the center of the sluice using a wide-angle flare will increase its effectiveness and therefore increase gold recovery is false. On top of that, miners drop material into the center of the slick plate. This forces material into the center of the sluice, which is quickly overloaded by the volume of material and will cause the first series of riffles to lose their effectiveness. Remove the flare from your sluice to eliminate the center concentration and create an even flow across the machine. You can create a V-shaped wing dam with a short straight section in front of your sluice if you need increased water flow or speed. Casting your material across the width of the sluice will eliminate overloading of the riffles. Understanding how water height and speed changes your recovery can also make all the difference in boosting gold returns: Water height. Begin with the water flowing just above the riffles or drops. Run small amounts of material and watch as the dirt passes through the sluice. Notice how the material enters the riffles or droops. Be sure to use the correct method of casting material evenly from side to side. Gradually increase the water height until processing suffers. This will determine the minimum and maximum water height for your sluice or highbanker. Water velocity (speed). Set your sluice water height for max processing and a fairly fast flow, then gradually reduce water speed as you process small amounts of material. You may have to adjust your sluice to maintain proper water height through this process. Note how changes in water speed decrease the quality of material processing. Spend some time exploring water dynamics. Introduce only one variable at a time, and verify how your gold recovery is affected before moving on. No doubt, with a little more understanding and experimentation, you’ll recover more gold with your sluice! Monday, October 01 2018
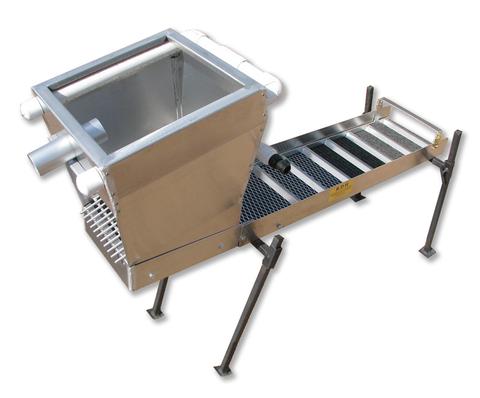
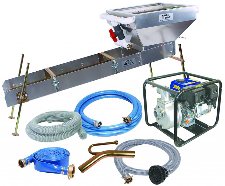
A highbanker, sometimes called a power sluice, is a very flexible and efficient piece of equipment when you’re gold mining in areas with a good amount of water. Their main use is to allow you to pump the water to the gravels rather than carrying heavy buckets of gravel to the water. The optimal place to use a high banker is a location along a river where there are lots of bench gravels that have been left Hopper: The feed box contains a grizzly screen with a water spray bar. The water is normally sprayed from simple plastic pipes with a series of small holes drilled into them. A water valve located ahead of the spray pipe controls the amount of water flow going into the feed box sprays. A series of rods are arranged to make a slat-type screen (called a grizzly) that allows water and smaller material to fall through and go down into the sluice box. The large rocks that are caught by the grizzly are washed with the spray and then rejected. The slats should be set on an angle so that most of the larger gravel will slide off the slats by the pull of gravity without you needing to push them off by hand. Some rocks may hang up, but for the most part, they will slide off on their own. The spray water comes out under a lot of pressure and washes any loose sand or clay into the sluice and also provides part of the water needed to move material through the sluicebox area. Sluice: High bankers utilize a normal sluice to recover the gold from the gravels, and the operation of the sluice box portion of a high banker is basically the same as that of a hand or stream sluice. With a highbanker, the water is supplied by a pump rather than the flowing water of a stream. The matting and miners moss underneath the sluice’s riffles are the same. Gold flakes get caught in the riffles and moss the very same way as it does in a hand sluice. A nice back-saving bonus on a high banker is that it will be on legs, so you can operate it on any terrain. A normal hand sluice lays on the bottom of a streambed. Pump: The centrifugal type pump should be set near the water as it is more efficient to pump water uphill to the sluice than to suck it up to the pump. This is only important where there is a lot of vertical distance between the pump and the sluice. If there is less than 10 feet of vertical distance, it does not matter much. Pumps can be set up quite a distance away horizontally from the sluice. It will work so long as there is sufficient water at the source where the pump is located. Vertical distance is more of a problem than horizontal distance; 30-40 feet is the maximum vertical climb for most pumps. The standard lay flat type of hose is used to carry the water up to the feed hopper. Be sure to have enough hose and some extra in case you spring a leak! Remember to position the pump so that you aren’t breathing motor exhaust fumes all day! The big advantage of a highbanker is working materials that are found in a location away from a river, like benches and other isolated patches of gravel. Moving the water to the sluice with a pump saves you from carrying the material down to the stream. The only disadvantage to highbanking for gold might be that it’s more equipment to pack around than just your usual digging equipment. It would be wise to test your ground before hauling in your high banker. Testing will indicate if there is enough gold in the gravels to warrant bringing in more than a hand sluice. If you have at least an amount of gravel that represents a full day of digging and sluicing, bring in a highbanker. The adjustment of a high banker is much less than the steep slope you usually would use with a hand sluice. Adjust the water flow to the minimum flow rate that it takes to get all the rocks that fall through the screen to keep moving down the sluice box section. If rocks or gravel hang up and bury the sluice, you need more water and perhaps a steeper box angle to wash that stuff away. The height of the feed box is another important adjustment. You want it low to allow you an ease of feeding in the material. If too high, you will hurt your back lifting heavy shovels full of gravel. Too low and you may be constantly sweeping away tailings at the back of the sluice. The feed box itself should be adjusted to ensure the angle of the slat screen rods (the grizzly) allow the gravel to be well washed before it moves out as waste. This is because a lot of small gold adheres too the larger cobbles. If rocks and cobbles just roll through without getting a thorough washing, you will be losing gold. The rejection of the large oversize rocks is important as it lets your sluice to a better job. If those bigger rocks make it into the sluice, you’ll be getting much worse recovery of fine gold. Be sure the foot valve or strainer on the intake hose is clear and able to deliver a full water flow. Sometimes the foot valve can get clogged with leaves or other debris. A blocked or partially obstructed foot-valve won’t allow the high banker to operate properly. For environmental reasons, it is a good idea to have your water drain into a pond or pit that is not directly connected to the stream. This is so that the clay and mud can settle out, otherwise make sure there are no legal issues of putting that mud back into a flowing stream. Some models of highbankers can also be run as a dredge. These highbanker/dredge combos can save you money, offer flexibility, but are also a bit of a compromise since the dredge portion is generally small. Combo units will be equipped with a suction nozzle type of intake. This design is best for working small shallow streams and tributaries. These systems are designed to be set up alongside the stream edge and have adjustable legs rather than float systems that you’d normally see on a larger suction dredge. With a suction nozzle and more hoses, the combo unit will operate as a suction dredge, picking up material from underwater crevices and delivering it to the sluice. Highbanker/dredge combos also can be ideal for working in and around ponds in old hydraulic mining pits. The next time you are out in the field, consider if a highbanker or power sluice can help you get more gold. To determine if the answer is yes, ask yourself these questions: Where is the nearest water? Can I shovel directly from the diggings into the feed hopper? Can I set it up to allow gravity to do a lot of the tailings clearing work? Where will the pump go? With a little thought and planning, you’ll be able to decide if highbanking for gold will increase your productivity. In most cases it will. Move more dirt, get more gold! Good luck! Monday, July 30 2018
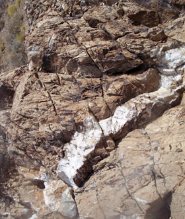
Places where gold naturally concentrates in an environment of streams and drainages are k When deciding where to start sampling, it’s helpful if you think of a river or stream as a sluice box. Waterways obviously don’t have aluminum riffles and matting, however, they do have natural gold traps that do the same thing that a sluice will do— allow gold to settle out of gravels and be caught while the bulk of the sands continue downstream. Heavy material such as gold doesn’t get spread along evenly, it is most likely caught in certain areas. The downstream parts of inside bends in a stream are favorable places to look for pay streaks. Just how good depends on how sharp the bend in the stream actually is. Usually the sharper the bend, the better the pay streak. If a tributary is known to have coarse gold, look at the intersection of the tributary and the main channel. Behind an obstruction (large boulder, an island, or an outcrop of bedrock) is another good place to look for a pay streak. Boulders and other obstructions can create turbulence where ordinarily smooth flowing water turns into fast flowing whitewater. It is between the fast white water and the quiet dark water that gold drops out. The coarsest gold tends to be found on the outer parts of the pay streak, and the finer-sized gold is on the inner part of the pay streak. When you are working, if it seems as if the streak is petering out as you go toward the middle of the water flow because you are finding little gold, this region of the pay streak is often where the biggest number of nuggets are most likely to occur. Once you know where paystreaks form, you might wonder if they are more likely found on bedrock or in gravels. They are nearly always found on bedrock or some sort of false bedrock. False bedrock might include caliche, a clay layer, or just a well-packed hard pan. You may just get lucky and hit something great with your first shovel of dirt, but more likely you’ll need to test a few different places. Even very experienced prospectors need to keep testing to find those hotspots and paystreaks. Good luck and keep sampling! Wednesday, June 14 2017
Fun and exercise are two great reasons to go gold prospecting, but you might as well make some money while you're at it, right? The best way to do that is to increase production rates. Assuming you are mining on a known gold-bearing claim or waterway, volume is the key to your success!
A dredge or highbanker/suction dredge combo is the next step up. A dredge uses a gas motor to generate the suction that will load and transport the material to the sluice, which greatly increases volume, as well as allows you to reach gravel on the river bottom that would otherwise be inaccessible (unless the river is seasonal or there is a prolonged drought). The more material a dredger can push across the riffles, the more gold can be recovered. An additional benefit to dredging is that it also allows you to clean gold out of all the cracks and crevices in the bedrock. A shovel just cannot do that. The size of the dredge intake nozzle is the most important factor in how much material a dredge can process, but it is not a direct one-to-one relationship. For example, a 5 inch dredge will not move twice the material that a 2.5 inch dredge can move. It actually can move much more. The surface of the hose is figured in square Beyond dredges or highbanker/suction dredge combos, you can get into some professional mining set-ups that use trommels and jigs and shaker tables and earth moving equipment. Every deposit is different, varying in size and grade and structure. Environmental conditions and access will dictate mining methods and knowing the rock types and size of the gravel is critical in determining which equipment will work best for increasing your production. Finding a suitable deposit to mine and finding a way to work it economically— to justify your time and expense— is the first step. Then choose the right equipment to increase your recovery rate and speed of recovery and make more money. Good luck! Saturday, July 02 2016
Although there are many variables that go into catching gold in a sluice, perhaps properly “tuning” your sluice is the most critical. A few months ago, Steven “Doc” Vetter, owner of Gold Hog brand mats, wrote an interesting article for Gold Prospector Magazine that focused on a few key factors that all miners should pay attention to. The following ideas from his article are all about achieving the proper tuning exchange, meaning letting the junk flow out, or be worked out by exchange zones, and holding the stuff you do want—gold. A well-tuned sluice will have heavy gold concentrations up top, medium gold in the middle, and trace gold near the end Hydraulic Equivalence: By definition, “hydraulically equivalent” (HE) refers to particles of varying size, shape and density that fall out of a water flow and deposit in the same area. While quartz rock and gold vary greatly in specific density, you can make them collect in the same place by making the quartz rock bigger and rounder. A 2 inch quartz rock and a 1 mm sphere of gold will fall through water and deposit in about the same place— making them hydraulically equivalent (HE). An opposite example is a .25 inch round piece of gold and a .25 inch round piece of quartz. The gold will sink through the water and likely land straight down. The quartz rock, however, will not fall as fast and will be pushed several feet away before it settles. These two items are not HE. The shape of the gold has a big influence on its HE. Flat things move more easily than spheres when either moving water or air is introduced. HE is a huge factor in gold mining and is often the main reason for classifying material to a certain size— the theory being if everything is about the same size, the heaviest material will stay in the sluice. When you slow down a sluice, you start to have a traffic jam. Things that are HE all want to gather in the same deposit zone and you start to gather/open the window for more non-gold particles to pile up and that’s not good. Incremental Processing: A great analogy of how this principle works is to picture a city bus. Imagine a rule where all passengers must enter through the front and must exit through the back. As they enter, passengers must fill the seats in the front of the bus first. Every time the bus makes a stop (you shoveling dirt into the hopper of your highbanker or sluice), the first few rows fill up quickly and remain full for a short period of time. As a new passenger (each new shovel full of material) gets on and finds the front seats taken, he must move further down the bus (sluice). The result is a bunch of folks all competing for the same seats up front and when there are no seats up front, they must take the next available one. If all the seats get full, a passenger (your paydirt) never even gets to sit down and exits the bus (sluice) without ever sitting (collecting in the riffles). As the working zones in your sluice fill up, slurry material will move down to the next zone before it settles there. During times of heavy loading, the first percentage of your sluice will load up heavy and take some time to exchange out. That means gold will keep traveling until it finds an “empty seat.” If you load too heavy or have too short of a sluice, you’ll have gold flowing over holding zones that are busy working and exchanging. It may take an exchange center (vortex) 3 or 5 seconds to fully process down material and exchange out non-gold and heavies. Fine Tuning: Because of the principles of Hydraulic Equivalence and Incremental Processing, you may have realized that slowing down a sluice can really cause problems and loss of gold. How do you know if your sluice is running too fast or too slow? Experiment! Of course doing so is a little scary because the #1 fear of most gold miners is losing gold, and quite honestly, until your sluice is fine tuned, that just might happen. To avoid losing gold, most miners start running their sluice at the “normal” or widely accepted pitch of 1 inch per foot. But this is just a starting point. If you see gold in your tailings, your first thought is probably to slow it down so you aren’t blowing gold out of the sluice. But perhaps that’s not the cause at all. Perhaps it’s because gold doesn’t have a place to sink down into and hide in your sluice. Experiment by running way too fast, say at a 15-degree pitch. Then take it to 13 degrees, then go down to 12.5. Keep adjusting until you find an acceptable capture rate for the size of gold you want to hold. Lose your fear of losing gold through testing and experimentation. Not only will you fine tune your sluice, but you’ll also get a great education. Good luck! Saturday, March 01 2014
Natural Factors to Consider Before Digging for Gold:
Wednesday, May 02 2012
Place your sluicebox in the flow of a stream or river so that the water enters the flared end and flows through the sluice. If the current is strong you may need to lay some stones against the edge of the sluice to keep it from washing away. The sluice should be set at a downhill angle that allows the material to briskly flow through it. The higher the volume of water available, the shallower the angle will be. |

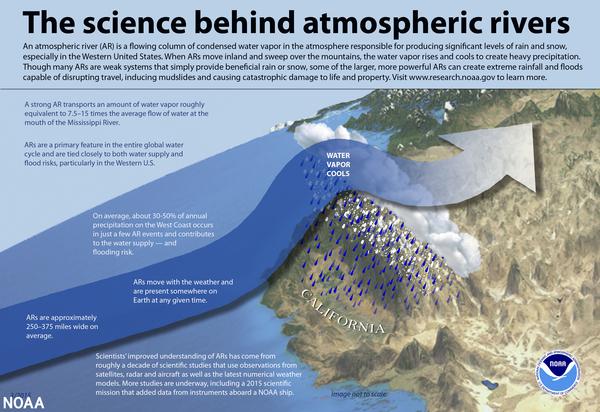 Atmospheric rivers are large, narrow sections of the earth's atmosphere that carry moisture from the earth's tropics near the equator to the poles. On average, the earth has four to five active atmospheric rivers at any time. A vast majority of atmospheric rivers happen in the fall and winter. The northern Pacific Coast receives the bulk of activity in the fall, and the California coast receives more in the winter. Since December 2022, the U.S. West has been slammed with back-to-back-to-back atmospheric rivers. These events provide as much as half of the region’s annual precipitation, bringing much-needed water to parched lands and adding to the snowpack in the high mountains. This year’s storms have done a lot to restore the landscape drought and is “greening up” the landscape and refilling many smaller reservoirs.
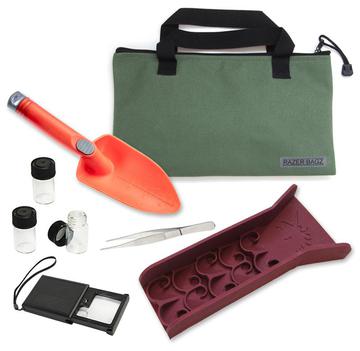

 nown as paystreaks. No matter if you are panning, sluicing, dry washing, or metal detecting, in many ways your success at gold prospecting comes down to locating these elusive natural pay streak concentrations. Keep in mind that most gold paystreak formations occur during times of flooding and that many factors affect how gold gets deposited. Perhaps the biggest factor is that gold is dense and is more than 19 times heavier than water. The denser an object, the more easily it will resist the flow of moving water. That means it takes a very strong and fast moving water flow to move along a nugget the size of a pea.
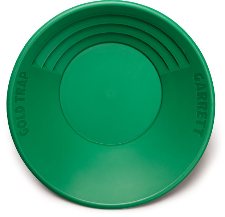

 Some say that "gold is where you find it" and while that may be true, once you arrive at a known gold-bearing location, how do you decide where to dig first? Successful prospectors follow different methods, so there is no single "right" way, but no matter if you are sluicing, dry washing, or metal detecting, if you first consider the "lay of the land" you can better pinpoint a place to start.
 Man-Made Factors to Consider Before Digging for Gold:
|
Nugget of News Blog |