


Sunday, November 24 2019
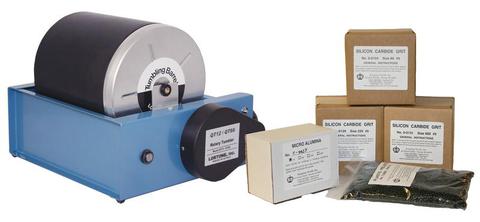
A rotary rock tumbler is the most popular and least expensive type on the market today. It has a system of durable rubber barrels that rotate around a metal cylinder to tumble and polish the rocks inside. They are easy to use and create smooth, polished stones in 4-6 weeks. Finished rocks will have a rounded shape regardless of what they looked like when you started. Some models have multiple barrels so you can tumble two different types of rock, or process two batches at different stages of the tumbling process. The opposite type is called a vibrating rock tumbler.
Monday, November 04 2019
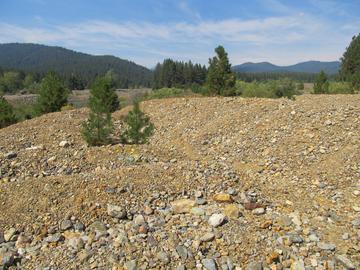
Ground cuts are basically the trenches in the ground from which ground sluicing gets its name. These narrow trenches carried the water and gravels to the sluice box, and sometimes they were the sluice boxes themselves. Sometimes gold that escaped the sluice box is left within these cuts. Stacked rocks. In narrow and steep locations there was little room for the miners to move the rocks away. Instead, miners of yesteryear were forced to stack the rocks into walls alongside the stream where they were working. Sometimes unworked gravels lie underneath these stacked rock walls. Keep an eye out for situations where these walls sit on gravel and not on the bedrock itself. Piles of rocks. In many locations the gravels contain rocks that are too large to pass through the sluice. These big rocks and large cobbles are tossed into piles. The bedrock between them can be very productive, and if they are not too large and deep, you will find that the bedrock underneath them is often productive. It is worthwhile to roll the rocks aside and check out what is underneath. Areas stripped of ground cover and top soils were often left behind as the mining operations processed these materials for their gold content. Sometimes tiny nuggets will get caught in the rough surface of the bedrock and this can be prime territory for metal detectors designed for nugget hunting. Ponds and dams. Small-scale ground sluice operations and even larger hydraulic mining operations simply could not afford to bring water from long distances, so they built ponds close by to hold their water above the workings. When you find them, check out the nearby placer workings. Drywasher piles. In the desert where sluicing was not possible, dry washers were used to process the gravels. These leave distinctive piles of coarse and fine screened materials that are right next to each other. Dry washers are not as efficient as wet sluice operations, so check these piles for nuggets that might have been missed. Hydraulic Mine Workings. When the old miners found large deposits of gravel caused by erosion, they would dig trenches to bring nearby water to the gravel and use the water pressure to wash away the gravels. Check any exposed bedrock very thoroughly because they frequently missed narrow fissures and cracks that can hold nuggets. Exposed bedrock in and around old workings is always worth checking out. Although this is not a complete list, it may provide clues about where to look for gold that you may not have considered. To avoid disappointment, remember that an indicator in one location may not hold true in another location. For example, visible vein quartz on the ground is a valuable indicator in some districts, yet you might find a spot where there is so much vein quartz scattered everywhere that it becomes worthless when trying to pinpoint gold. Other places that have good gold might be completely devoid of any visible vein quartz. One of the great secrets of successful prospectors is that they get out into the field often and work hard at searching. Your mining equipment will not find any gold while stored in your house or garage. Get yourself out in the field as often as possible and enjoy it to the fullest! |
 One of the most frequently asked questions has got to be “What signs should I look for when out prospecting that will indicate good gold in the ground?” Unfortunately, there is no simple “one-size-fits-all” answer. Gold occurs in so many different types of deposits, therefore, indicators in one place for one type of deposit don’t always work very well for another. But in general, one of the very best places to look for gold today are in places where old-time miners successfully found it in the past. Sometimes there are very obvious signs of their digging and mining. Old-timers never got all of the gold, and they for sure didn’t have the arsenal of tools and equipment like we have today! The following man-made indicators of previous prospecting might help in your modern-day quest for gold:
|
Nugget of News Blog |