Nuggets of News Blog
|  |
Friday, September 29 2023
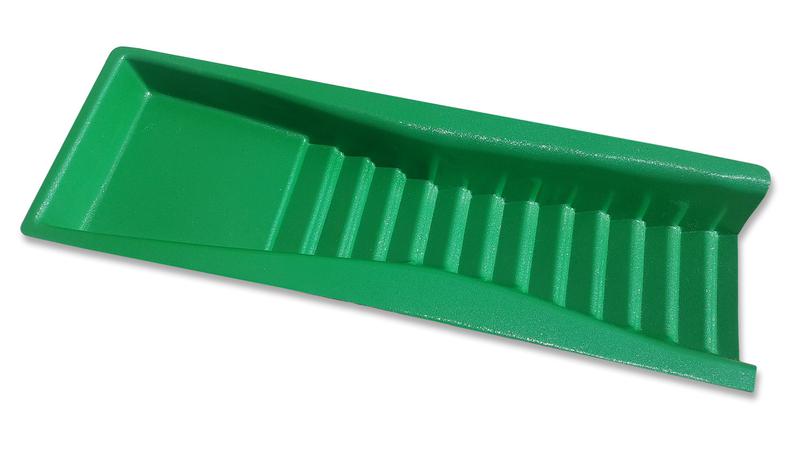
Gold concentrations are spotty, even in known gold-bearing areas, so most prospectors sample and test often using a simple gold pan. 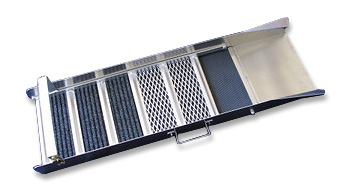 They keep moving until they get good results. Once you find a spot with fairly large amounts of gravel that yields good gold, then it’s time to bring in a sluice box. A sluice is simple to operate and has been used all across the world for thousands of years. A sluice is often the first large-scale concentration device purchased by miners. The advantages include low cost, versatility over a wide range of material and water conditions, and ease of setup and use. They keep moving until they get good results. Once you find a spot with fairly large amounts of gravel that yields good gold, then it’s time to bring in a sluice box. A sluice is simple to operate and has been used all across the world for thousands of years. A sluice is often the first large-scale concentration device purchased by miners. The advantages include low cost, versatility over a wide range of material and water conditions, and ease of setup and use.
There are many different types of gold sluices and brands from which to choose. Sluices come in a variety of sizes, most with gold-catching matting, carpeting or miner’s moss in the bottom that you need to clean up at the end of the day. Other models contain no matting or carpets but can still catch fine gold. Whichever sluice box you use, sluicing techniques are overall fairly straightforward and it’s open design allows you to see how the material is being processed and recovered. As you get started sluicing, or begin to improve your technique and results, you can maximize your gold recovery by keeping in mind proper selection and setup, material classification and processing. Learn how material and water speed affect gold capture, and how fine-tuning your techniques to match material type and water conditions can lead to increased recovery.
Proper Setup of your sluice is by far the most important aspect of gold separation and recovery. Some common mistakes too watch out for are:
- Improper sluice angle is probably the most common error that gold miners make. The old rule of thumb is to set sluice angle to one inch per foot, but that usually results in too much water velocity, resulting in improper breakdown and separation of heavy concentrates and material moving through the box too quickly. Instead, focus on water velocity, not so much of the angle. Measure 12 inches down your sluice box and make a mark prior to going out to a stream. Feed your material into the sluice in a side-to-side motion. As the material moves through the box, count a slow “one thousand one” and your material should be passing your mark. Only if it needs to be faster should you increase your rear angle. If it needs to be slower, decrease it. This is solely dependent on your classification. If you change classification, you might need to change the angle of your box.
- Too much water in the sluice is a common error. Having too high of a water column allows fine gold to run above the capture area. Running too much water also allows the material column to be wider and denser, which can carry gold out of the box without it being pushed into the capture area.
- Horizontal leveling of your sluice is critical to proper movement of material, as well as the separation and capture of fine gold. As the material travels down the slick plate and moves down the sluice, it is very important to utilize the entire capture area to process the material. Improper horizontal leveling forces material to one side or the other, leaving one side clogged while the other side is not processing at all.
 Matching material classification and processing speed/volume of material to your sluice is critical to maximize gold recovery. First pan test the material you run through the sluice to provide you with both the size and quantity of gold in the material. In order to capture small gold in quantity, finer classification is usually necessary. While it takes more time, miners get the benefit of removing more material that is not gold bearing - making each bucket both more valuable and easier to run through the sluice box. Processing speed and volume of material to put in sluice (by hand or by scoop) must be matched to the volume and velocity of the water. If too much material is introduced into the flow, the water velocity will slow down and cause the sluice to back up and lose gold. It is much better to gradually add smaller amounts of material to the flow. If you are adding material into the sluice using a scoop, avoid adding material like an ice cream scoop because that disrupts the water flow. Instead, turn the scoop into the flow and gently move the scoop side-to-side while the water pulls material. Matching material classification and processing speed/volume of material to your sluice is critical to maximize gold recovery. First pan test the material you run through the sluice to provide you with both the size and quantity of gold in the material. In order to capture small gold in quantity, finer classification is usually necessary. While it takes more time, miners get the benefit of removing more material that is not gold bearing - making each bucket both more valuable and easier to run through the sluice box. Processing speed and volume of material to put in sluice (by hand or by scoop) must be matched to the volume and velocity of the water. If too much material is introduced into the flow, the water velocity will slow down and cause the sluice to back up and lose gold. It is much better to gradually add smaller amounts of material to the flow. If you are adding material into the sluice using a scoop, avoid adding material like an ice cream scoop because that disrupts the water flow. Instead, turn the scoop into the flow and gently move the scoop side-to-side while the water pulls material.
When setting up your sluice, you are bound by the conditions at hand. However, three factors are in your control: water input, water height and speed (sluice angle), and introduction of material into the sluice. One or more of these factors may need to be adjusted as conditions change. It all comes down to which of the two types of water you will be forced to use. When using stream flows, you are bound by the characteristics of nature— water speed, depth, ability to change sluice angle. Miners must harness the natural conditions. Sluice stands can sometimes help. Mechanical flow provides miners with the ability to regulate all facets of material processing. You can control flow and depth at the flare, and sluice angle (water speed) at the rear of the sluice. These changes are dictated by the material you are processing.
Understand your sluice’s capacity— how much can the sluice hold before it loses its ability to separate heavy materials and capture gold. If you begin to see material slippage (movement of heavy material down the sluice) or movement of captured gold, it is time to remove your sluice from the stream, then clean and reset it. If you consistently process difficult material or your collection method has a low capacity, then setting up a cleaning schedule will save you from losing gold.
There is no one perfect sluice configuration that fits all water conditions and material types. Therefore, it is always best to match sluice configuration to the conditions and material at hand. As you run material, continually monitor how the sluice is processing the material (liquefaction, separation, capture and expulsion of waste materials). These basic techniques can be used with a variety of sluice designs, allowing miners the ability to recover gold as conditions change throughout the year. Also know that the real secret of successful prospecting is not only in operating the equipment, but in the skill of finding those natural gold catches. Learning to read the river or stream and recognize the places where gold might accumulate and then sampling those places to see if you are correct is the best technique. Inside bends, behind boulders or bedrock outcrops, and inches above the stream flow are all good places that you might sample, but there are plenty of other possibilities as well. The low-cost advantage of sluicing allows you to tailor equipment to conditions and material in your area. Good luck! configuration to the conditions and material at hand. As you run material, continually monitor how the sluice is processing the material (liquefaction, separation, capture and expulsion of waste materials). These basic techniques can be used with a variety of sluice designs, allowing miners the ability to recover gold as conditions change throughout the year. Also know that the real secret of successful prospecting is not only in operating the equipment, but in the skill of finding those natural gold catches. Learning to read the river or stream and recognize the places where gold might accumulate and then sampling those places to see if you are correct is the best technique. Inside bends, behind boulders or bedrock outcrops, and inches above the stream flow are all good places that you might sample, but there are plenty of other possibilities as well. The low-cost advantage of sluicing allows you to tailor equipment to conditions and material in your area. Good luck!
Tuesday, May 23 2023
Garrett has announced a new promotion for summer 2023 — buy the Ace 300, Ace 400, or Ace Apex metal detector and get a Pro-Pointer pinpointer for a LOW price! Big savings over purchasing the detectors and pinpointers separately! LIMITED TIME OFFER WHILE SUPPLIES LAST.... or until Garrett says it's over!
ACE 300 SPECIAL - Includes an ACE 300 detector + AT PRO-POINTER for $369.95 — SAVE $27.95 compared to purchasing each item separately.
ACE 400 SPECIAL - Includes an ACE 400 detector + AT PRO-POINTER for $459.95 — SAVE $25.95 compared to purchasing each item separately.
ACE APEX SPECIAL - Includes an ACE APEX detector + wireless PRO-POINTER AT Z-LYNK for $555.93 — SAVE $86.97 compared to purchasing each item separately.
Thursday, April 13 2023
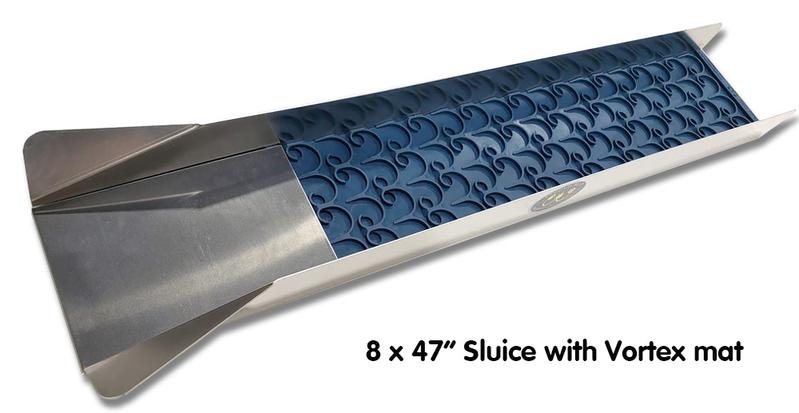
Over the years you may have tried many different types of mats, carpets, riffles, and miners moss, but Dream Mat was inspired solely 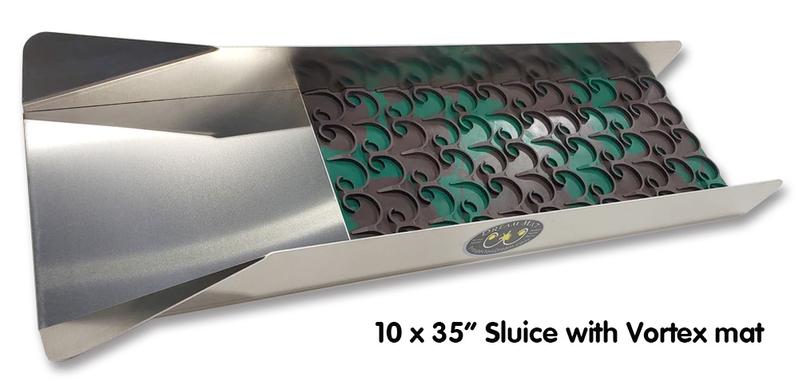 to help prospectors work less to get more gold! The Dream Mat is the first sluice mat ever to be scientifically engineered and designed using advanced fluid dynamic principles and physics. The mini Hydro-Cyclone inspired vortex cells classify, separate, capture and hold gold naturally. Dream Mats vortex cells exploits natures own forces in a patented system to bring the finest gold recovery ever created. These mini cells are engineered to capture the finest of gold without needing huge amounts of water to maintain good exchange. Big gold is really heavy and Dream Mat captures and holds the bigger gold in its vortex holding cells, just like it does with fine gold. Made in the USA. US patent 9168536 B2. to help prospectors work less to get more gold! The Dream Mat is the first sluice mat ever to be scientifically engineered and designed using advanced fluid dynamic principles and physics. The mini Hydro-Cyclone inspired vortex cells classify, separate, capture and hold gold naturally. Dream Mats vortex cells exploits natures own forces in a patented system to bring the finest gold recovery ever created. These mini cells are engineered to capture the finest of gold without needing huge amounts of water to maintain good exchange. Big gold is really heavy and Dream Mat captures and holds the bigger gold in its vortex holding cells, just like it does with fine gold. Made in the USA. US patent 9168536 B2.
Mini Dream Mat is ideal for sandy areas and black sands. Great for 1/4"-3/8" screened runs. Catches the gold everyone is missing! Mini Mat is great for that hard to catch gold!
Vortex Dream Mat is the original Dream Mat that's great for both large and fine gold recovery— less cons, more gold, instant clean out. There is nothing not to like about this mat!
How Does Dream Mat Work so Well?
Traditional sluice mats have a fluid dynamic called "secondary boundary layer" that migrates gold through the sluice. This layer of rolling, moving fluid constantly moves the material out the direction with the flow. Only Dream Mat continually stops this process by profiles that spin the flow on a vertical axis back against the flow. Acting like a swirling cheese grater, it constantly breaks down the process of the rolling "secondary boundary layer" and captures the fine gold in a collection cell in a safe, active fluid bed of black sands. Like a circular run-away truck ramp, the heavy gold is quickly trapped and sinks to the bottom. Finally a sluice mat that Prospectors Dream of!
 What is Dream Mat Made of? What is Dream Mat Made of?
Dream Mats are made of polyurethane (not cheap rubber or silicone!). Polyurethane is cut and wear-resistant; weight sustainability is 10x fold what rubber is. Dream Mat will expand in the sun and shrink in the cold. If you leave the mat folded over while under stress and it freezes, it may crack. If you find that suddenly your mat no longer fits the sluice, submerse it in cold water first. UV light can affect the color of your mat, but it will not negatively affect the longevity. Take care of the mat and you will have it for years to come!
Tips to Get the Most out of Your New Dream Mat Sluice:
• Before first use, wash your Dream Mat with detergent in warm water with a soft brush or cloth to release any excess release agent left over by the manufacturing process. Wash both top and bottom of the matting. You might see some small bubbles in the mat pattern. With the many cells that are concentrating minerals for you in the Dream Mat, rest assured that the hydro cyclone nature of the system will override most small bubble imperfections and have very little overall effect.
• Feed rates will depend a lot on your water flow velocity, but the easy way to gauge when your cells can handle more material is the water clears up and more of your mat's surface is exposed. To get a feel for your mat, feed a scoop or two and watch what happens -- you want to see your material dancing around in the cells. Don't be afraid to have a lot of water over your mat; an inch over the top is a good place to start. It will handle the volume quite easily!
• A good rule of thumb is 9-9.5 degrees of pitch. You can pull this back marginally for fine sand or go a little steeper if you're dumping a lot of heavy material into your sluice that needs more momentum to clear out.
Browse Now — Dream Mats for Stream Sluices, Power Sluices, and Gold Cube.
Wednesday, March 29 2023
Did you know that “bad” weather can be really GOOD for gold prospectors? Of course no one ever hopes that Mother Nature causes catastrophic loss of life and property, but the ups and downs of weather events in any gold-bearing area are something to take advantage of. Nature can help all of us in our quest for the shiny stuff— especially in light of recent atmospheric rivers causing flooding and lots of snow in California, eastern Idaho, northeast Utah, northwest Colorado, the Cacade Ranges, portions of the northern and central Rockies, and portions of Arizona and Nevada.
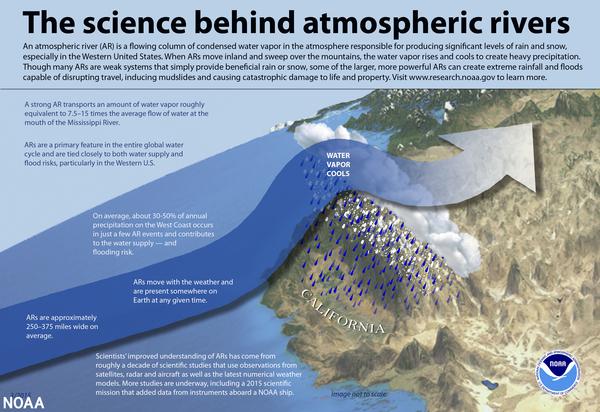 Atmospheric rivers are large, narrow sections of the earth's atmosphere that carry moisture from the earth's tropics near the equator to the poles. On average, the earth has four to five active atmospheric rivers at any time. A vast majority of atmospheric rivers happen in the fall and winter. The northern Pacific Coast receives the bulk of activity in the fall, and the California coast receives more in the winter. Since December 2022, the U.S. West has been slammed with back-to-back-to-back atmospheric rivers. These events provide as much as half of the region’s annual precipitation, bringing much-needed water to parched lands and adding to the snowpack in the high mountains. This year’s storms have done a lot to restore the landscape drought and is “greening up” the landscape and refilling many smaller reservoirs. Atmospheric rivers are large, narrow sections of the earth's atmosphere that carry moisture from the earth's tropics near the equator to the poles. On average, the earth has four to five active atmospheric rivers at any time. A vast majority of atmospheric rivers happen in the fall and winter. The northern Pacific Coast receives the bulk of activity in the fall, and the California coast receives more in the winter. Since December 2022, the U.S. West has been slammed with back-to-back-to-back atmospheric rivers. These events provide as much as half of the region’s annual precipitation, bringing much-needed water to parched lands and adding to the snowpack in the high mountains. This year’s storms have done a lot to restore the landscape drought and is “greening up” the landscape and refilling many smaller reservoirs.
How does this help you get more gold? Primarily, multiple weather events cause large amounts of gold to move and replenish areas that already have been worked. And even when the atmospheric rivers die down, the higher than normal snowpack will cause water levels in rivers to flow well into the summer instead of drying up in late spring. Higher water levels extend your mining season, and allow you to run high-production equipment such as highbankers and power sluices. Miners can also work stream bank deposits once the water recedes back to normal flows.
Typical winter storms that regularly occur in gold-bearing areas usually do not create enough havoc to force substantial amounts of "new" gold into movement. However, when Mother Nature really goes to work as we’ve seen lately, a great deal of gold can be set free, creating a bonanza for gold hunters. Gold veins that have been hidden for decades suddenly can be exposed. Floods can also sweep gold out of abandoned mines and wash it downriver. Known gold digs can be washed out, trees uprooted, and the landscape eroded— all pluses for prospectors! When tons of rock, cobble, and boulders are swept downstream along bedrock during a huge storm, quite a bit of destruction occurs. Plants, weeds, and trees that normally grow along the river and gravel bars are washed away. And when a major storm or flood tears up large portions of a streambed, a fair amount of this newly-released gold, because of its weight, will be deposited along the riverbed and settle into cracks and crevices (hand dredges are an ideal tool in this situation).
Stream bed layers caused by several floods over time are referred to as “flood layers.” Flood layers are usually a different color, consistency and hardness from the other layers of material within the streambed, making them easy to recognize. Larger, heavier pieces of gold will work their way down toward the bottom of a flood layer as they are washed downstream. The smallest and lightest flakes of gold might not work their way down through a flooding layer at all, but might remain dispersed within the material. Of course not all flood layers contain gold in large quantities, but it’s a good place to start. Some of the best areas to look for flood gold are where the stream or river widens out, or levels out, or changes direction. These areas can allow concentrations of gold to collect either on bedrock or in the contact zones between layers. Another place that tends to collect gold are gravel bars, especially the ones located towards the inside of bends in a waterway.
Even if you’re waiting for the weather to settle down and warm up and are not quite ready to start prospecting just yet, get out and keep an eye on the water flow so you can try to figure out where the gold actually drops out. Watch the flow lines around boulders and trees. Watch where the flows slow down. The rule of thumb — gold is in the inside bend where water is slowest — is a rule of thumb, but not always 100% accurate. Look for prospecting opportunities in the flow such as eddies, slack water drop zones and abrupt changes in direction caused by floodwaters. Look above current flows at the high-water mark because debris and bank outcroppings can create diversions in stream flows. Also notice flattened brush or grass and new boulder or cobble deposits. Especially if you’ve had minor gold recovery success in these areas in the past, you could really make out this year and beyond as gold is redistributed.
The 2023 gold mining season promises to be one of the best for small scale miners in many areas— especially California. Don’t miss your chance to experience a banner mining year in the Golden State and other western states. Get out there and get your share of the gold!
Friday, February 24 2023
Whether it’s mining for gold, silver, lead, zinc or other precious metals, it’s always fun to follow in the historic footsteps of the old time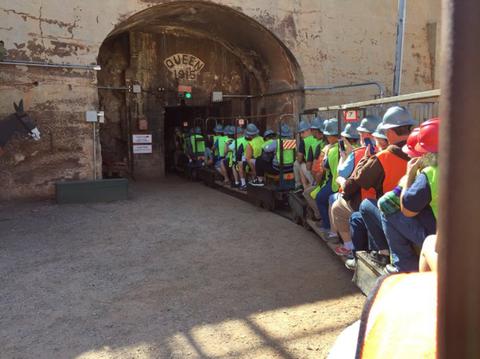 miners. To do exactly that and learn how copper and other ore was first mined in Bisbee, Arizona, take the underground Queen Mine tour. Outfitted with hard hat, miner’s headlamp and a neon vest, visitors ride 1,500 feet into the mine and learn about equipment, techniques, dangers and a century worth of history. Tour guides are actual retired miners, so you know you’ll get the real highlights of working underground. You’ll learn about blasting with dynamite, the role of mules, and even how miners went to the bathroom while working in the mines! miners. To do exactly that and learn how copper and other ore was first mined in Bisbee, Arizona, take the underground Queen Mine tour. Outfitted with hard hat, miner’s headlamp and a neon vest, visitors ride 1,500 feet into the mine and learn about equipment, techniques, dangers and a century worth of history. Tour guides are actual retired miners, so you know you’ll get the real highlights of working underground. You’ll learn about blasting with dynamite, the role of mules, and even how miners went to the bathroom while working in the mines!
Electricity changed the world from a predominantly rural society to the industrial age, and copper wire was needed to carry that electricity— and lots of it. Thanks to the insatiable demand for electricity, Bisbee was one of the greatest copper camps in the world. In nearly 100 years of continuous production (late 1880s until the mine closed in 1975), the local mines produced metals valued at $6.1 billion (at 1975 prices). This staggering amount of wealth came from the estimated production of 8,032,352,000 pounds of copper, 2,871,786 ounces of gold, 77,162,986 ounces of silver, 304,627,600 pounds of lead and 371,945,900 pounds of zinc.
The story of Bisbee mining began in the late 1870s when Lt. Dunn, in charge of a cavalry detail from the frontier Army post of Fort 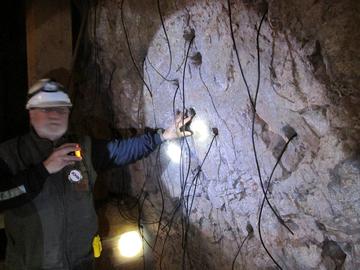 Huachuca, was on a scouting mission against the Apache Indians. Lt. Dunn and his men camped on a spot that is now occupied by Old Bisbee, only several hundred yards from the beginning of today’s mine tour. On a walk after dinner, Lt. Dunn picked up an interesting rock. He found a few more pieces along the slope of the south wall of the canyon. Unable to do anything about it because of military duties, Dunn took a prospector by the name of George Warren into his confidence and struck up a deal by which Warren would locate claims and work the property with Dunn as a partner. But on his way to the site, prospector Warren stopped to enjoy his favorite pastime—drinking whiskey with friends. Warren soon had new partners and staked a group of claims with them, leaving Dunn completely out of the deal. Huachuca, was on a scouting mission against the Apache Indians. Lt. Dunn and his men camped on a spot that is now occupied by Old Bisbee, only several hundred yards from the beginning of today’s mine tour. On a walk after dinner, Lt. Dunn picked up an interesting rock. He found a few more pieces along the slope of the south wall of the canyon. Unable to do anything about it because of military duties, Dunn took a prospector by the name of George Warren into his confidence and struck up a deal by which Warren would locate claims and work the property with Dunn as a partner. But on his way to the site, prospector Warren stopped to enjoy his favorite pastime—drinking whiskey with friends. Warren soon had new partners and staked a group of claims with them, leaving Dunn completely out of the deal.
Copper production began on a limited basis around 1880. At the time, those who toiled in subterranean tunnels beneath the Mule Mountains were mostly immigrant miners from Europe. Individuals and then companies with capital gradually became involved and took over individual claims and brought them into production. Phelps Dodge Corporation, through a subsidiary the Copper Queen Consolidated Mining Company, became the dominant force and eventually the sole operator of the mining district. Building on its base in Bisbee, Phelps Dodge had long been one of the largest copper producers in the United States. Although mining was closed in 1975, the Queen Mine Tour was officially opened in 1976 to keep the story of mining alive in Bisbee. Since then, millions of visitors from around the world have enjoyed the trip into the mountain on the underground mine tour train.
Hour long tours depart each day, seven days a week, from the Queen Mine Tour Building, located immediately south of Old Bisbee’s business district, off the U.S. 80 interchange. Reservations are required for underground tours. Closed toed and low heel shoes are mandatory. For information, reservations, and group rates call 866-432-2071 or visit https://www.queenminetour.com. Be sure to arrive 30 minutes before tour time. Interesting mineral displays, gift shop, and Bisbee Visitor Center are also found in the tour building.
Tuesday, February 14 2023
There are a variety of searchcoil sizes and shapes and configurations. The correct one to use depends on the environment it will be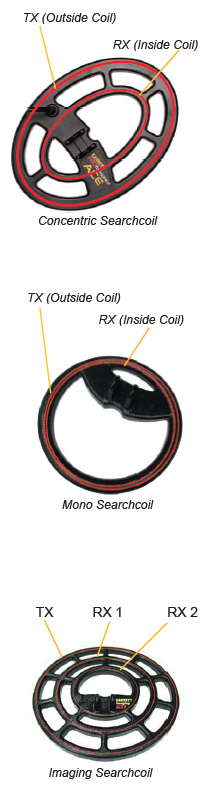 used in as well as the targets being sought. A change in any one of these variables may require a different searchcoil. Sometimes changing the search coil on your metal detector is the next best thing to buying a whole new machine! It is possible that merely changing the coil on your detector will lead you to a host of new targets. used in as well as the targets being sought. A change in any one of these variables may require a different searchcoil. Sometimes changing the search coil on your metal detector is the next best thing to buying a whole new machine! It is possible that merely changing the coil on your detector will lead you to a host of new targets.
CONFIGURATIONS
In addition to searchcoil sizes and shapes, there are also a variety of searchcoil configurations available, with each proving to be the best choice depending on hunting applications and ground conditions. The configuration of a searchcoil refers to the arrangement of the Transmit Coil (TX) and Receive Coil (RX) within the searchcoil shell. The most common configurations are: Concentric, Mono, Imaging, and Double-D.
Concentric
The concentric configuration consists of a TX coil and RX coil which are usually circular. The advantage of this configuration is that both the TX and RX coils are wound as large as possible within a given searchcoil diameter. This provides the largest possible detection fi eld and greatest detection depth, making the concentric coil potentially the most sensitive confi guration available. In addition, concentric coils also provide the most symmetrical detection field, allowing ease in pinpointing and consistency in target identification. For these reasons, they are the most commonly used searchcoil and will provide the best overall performance in most environments. Unfortunately, this configuration is the most susceptible to interference from ground minerals, which results in substantial loss of performance when used over heavily mineralized ground.
Mono
A mono-coil is available only on Pulse Induction detectors, such as Garrett's new Axiom Metal Detector, and is a variation of the concentric configuration. The mono-coil can be manufactured with the TX and RX coils located together or as a single coil acting as both TX and RX. The detection and performance characteristics of the mono are essentially the same as the concentric in that it provides the maximum possible sensitivity, but suffers some performance in mineralized ground.
Imaging
An Imaging searchcoil is an enhanced version of the concentric configuration that features an additional RX coil. This extra coil provides the detector with additional target information necessary for true target-depth perception and true target-sizing capabilities. With this additional sizing information, the detector can more fully characterize a target and for the first time distinguish between trash and good targets of the same conductivity (e.g. a quarter vs. a soda can). Only the Garrett GTI metal detector offers this technology.
DD Search coils have two smaller “D” shaped coils housed inside to penetrate heavily mineralized ground that is commonly encountered while gold prospecting and relic hunting. The Double-D configuration is designed to 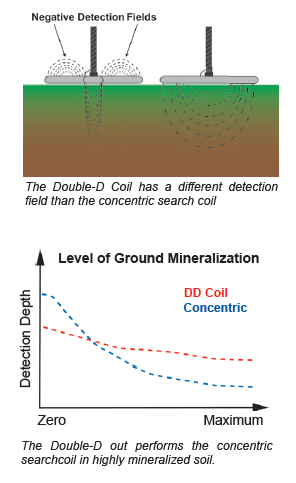 significantly reduce ground interference and, thereby, recover the performance lost by a concentric coil over mineralized soil. With the Double-D, it is the arrangement of the TX and RX coils that produce a canceling effect of ground signals. This configuration is called DD because both TX and RX coils are in the shape of a “D”. The positive detection fi eld of the DD runs beneath the overlapping center section from front-to-back. The remaining portion of the coil actually produces negative (i.e. canceling) detection fields. It is this canceling field that allows the DD coil to maintain performance over mineralized ground. Because of its small positive detection field, the DD is inherently less sensitive than a concentric searchcoil of the same size, over non-mineralized ground. The Double-D will, however, significantly outperform the concentric coil over mineralized ground. For this reason, it is highly recommended when hunting over mineralized ground commonly found when prospecting and relic hunting. significantly reduce ground interference and, thereby, recover the performance lost by a concentric coil over mineralized soil. With the Double-D, it is the arrangement of the TX and RX coils that produce a canceling effect of ground signals. This configuration is called DD because both TX and RX coils are in the shape of a “D”. The positive detection fi eld of the DD runs beneath the overlapping center section from front-to-back. The remaining portion of the coil actually produces negative (i.e. canceling) detection fields. It is this canceling field that allows the DD coil to maintain performance over mineralized ground. Because of its small positive detection field, the DD is inherently less sensitive than a concentric searchcoil of the same size, over non-mineralized ground. The Double-D will, however, significantly outperform the concentric coil over mineralized ground. For this reason, it is highly recommended when hunting over mineralized ground commonly found when prospecting and relic hunting.
It’s important to know the benefits of using various size, shape and configurations of coils because simply changing the search coil on your metal detector is the next best thing to buying a whole new machine! Garrett is the global leader of ground search metal detectors, pinpoints, coils, and other accessories. Browse Garrett detectors and more.
Part 1 covered search coil size, shape and depth.
Monday, February 13 2023
The searchcoil is a vital part of your metal detector. It generates a magnetic field and senses metallic targets in the surrounding environment. The size and depth of the magnetic field is determined by the shape and size of the searchcoil. Understanding the purposes behind the various sizes and shapes of searchcoils will empower you with the ability to choose the best coil for each application.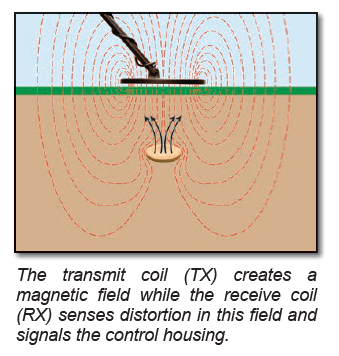
HOW SEARCHCOILS WORK
Searchcoils generally consist of two internal sets of coiled wires, a Transmit Coil (TX) and a Receive Coil (RX). Mono coils can be different in that one coil acts as both the TX and the RX. When the detector is turned on, the TX coil generates a magnetic field in the surrounding space. When a metallic object is within this generated magnetic field, it will create a distortion in the magnetic field. The RX coil will sense this distortion and send a signal to the control housing. A searchcoil’s detection pattern is determined by the combination of the TX’s generated field pattern and the RX’s sensing field pattern.
SEARCHCOIL DEPTH
The detection depth of a searchcoil, as a rule-of-thumb, will be approximately equal to its diameter, for a coin-sized object. However, as a searchcoil’s size increases and its field pattern becomes larger, the field pattern becomes less concentrated and begins to miss small objects. For a coin-sized object, this effect becomes noticeable when using searchcoils larger than about 15" in diameter. Since the field generated by a large searchcoil is larger, deeper and less concentrated than a small searchcoil, it is the best choice when hunting for targets that are usually large and deeply buried, such as caches or relics. there is a direct relationship between the size of a magnetic fi eld and the size of a coil. The bigger the coil, the larger the magnetic fi eld. Therefore, larger searchcoils generally detect deeper than smaller searchcoils.
SEARCHCOIL SIZES
- Smaller Search Coils (less than 6" in diameter): Great for “trashy” areas, really allowing you to sift through metal debris. These coils are best for tighter places and the smallest, shallow targets. Because the magnetic field of a small search coil is concentrated within a small volume, it is the best choice for hunting in areas with a lot of metal debris. This allows you to maneuver through and around trash to locate good targets, especially when searching in tight places where large searchcoils cannot go. In addition, because of their concentrated detection field, small searchcoils are the best for detecting very small objects. However, a small searchcoil provides less coverage per sweep; more scans will be required to cover a search area.
- Medium Search Coils (6-11" in diameter): Usually come standard with your metal detector, medium search coils are designed for general use in finding the broadest range of targets in the broadest range of environments. For general-purpose hunting, which typically includes coins and coin-sized targets, a medium sized searchcoil (8 - 9") is the best choice. Because a medium sized searchcoil provides the best combination of magnetic field concentration, detection depth and capability to detect the greatest range of target sizes within the detection area, it is standard with most detectors. In addition, it’s lightweight and easy to maneuver.
- Large Search Coils (over 11" in diameter): The larger the search coil, the deeper it will penetrate the ground. Great for finding caches or relic hunting, finding deeply buried, large targets. Large searchcoils generate wider and deeper magnetic fields than small coils and consequently provide greater depth and coverage. This means that scanning a search area requires fewer sweeps with a large searchcoil than with a smaller coil. This larger scan area, however, can become a problem in trashy areas where the search coil is detecting several targets at once.
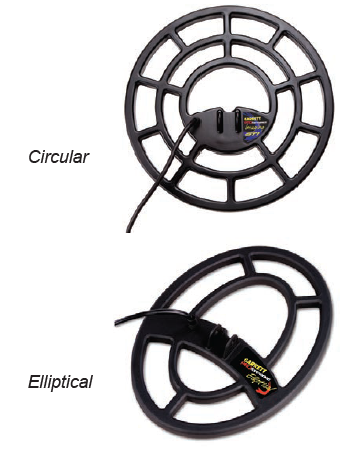
SEARCHCOIL SHAPES
Generally, search coils are circular or elliptical in shape. An elliptical searchcoil is more maneuverable than a circular searchcoil and its narrow width actually provides greater coverage than a circular coil due to its elongated length. However, a circular searchcoil has slightly more detection depth and sensitivity in non-mineralized soil, so it is still the most commonly used shape.
It’s important to understand the pros and cons of using various size, shape and configurations of coils because simply changing the search coil on your metal detector is the next best thing to buying a whole new machine! Most metal detectors come with a standard search coil that is good for general use – finding the broadest range of targets in the broadest range of environments. But search coils come in all shapes and sizes, and it's possible that merely changing the coil on your detector will lead you to a host of new targets in that “hunted out” area.
Garrett is the global leader of ground search metal detectors, pinpointers, coils, and other accessories. Browse Garrett detectors and more.
Part 2 — search coil configurations
Wednesday, February 08 2023
Grab your Garrett metal detector and accessories and head to Canton, Texas, April 14-16 for their Memorial Hunt! Ti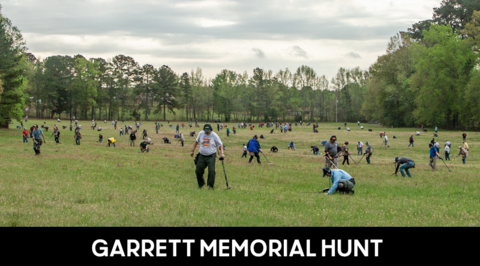 cket registration for the Garrett Memorial Hunt closes in less than a month, and with over $100,000 worth of prizes, you don't want to miss out. The more hunters who sign up, the more this value will increase! Tickets are limited, so be sure to secure your spot before they sell out. Sign-ups end March 1, 2023! cket registration for the Garrett Memorial Hunt closes in less than a month, and with over $100,000 worth of prizes, you don't want to miss out. The more hunters who sign up, the more this value will increase! Tickets are limited, so be sure to secure your spot before they sell out. Sign-ups end March 1, 2023!
Details:
Friday, April 14, through Sunday, April 16 in conjunction with Texas Association of Metal Detecting Clubs (TAMDC). The event will be held at:
First Monday (flea market grounds)
800 First Monday Lane
Canton, TX 75103
Basic Hunt Package:
- One hunt package fee covers all Garrett events!
- Participation in several prize hunts
- One Garrett Memorial Hunt T-shirt (if the hunt fee is paid before the deadline).
- Free First Monday park admission and tent camping (RV camping requires an additional fee).
- Hunters are free to search throughout the designated park grounds for native coins and relics.
- Additional details, hotel information, etc. found here.
Plenty of Fun for All Ages!
- Meet other treasure hunters and find some treasure! Or explore Canton's historic district and local museums.
- Free Kids Hunt for ages 12 and under.
- All prizes will be awarded! A random drawing will be conducted for unclaimed prizes.
- Treasure talk on Saturday by Jase Robertson, star of Duck Family Treasure TV show!
- Picnic and coolers allowed. Concessions available in Civic Center building on Saturday and Sunday.
Whether it's time to buy your first Garrett metal detector, an upgraded model, or additional coils, headphones, carry bag or other accessories, check out the selection of Garrett treasure hunting items here.
Saturday, November 19 2022
If you’re used to water mining, having success in the desert might seem challenging— that is until you start thinking of desert ground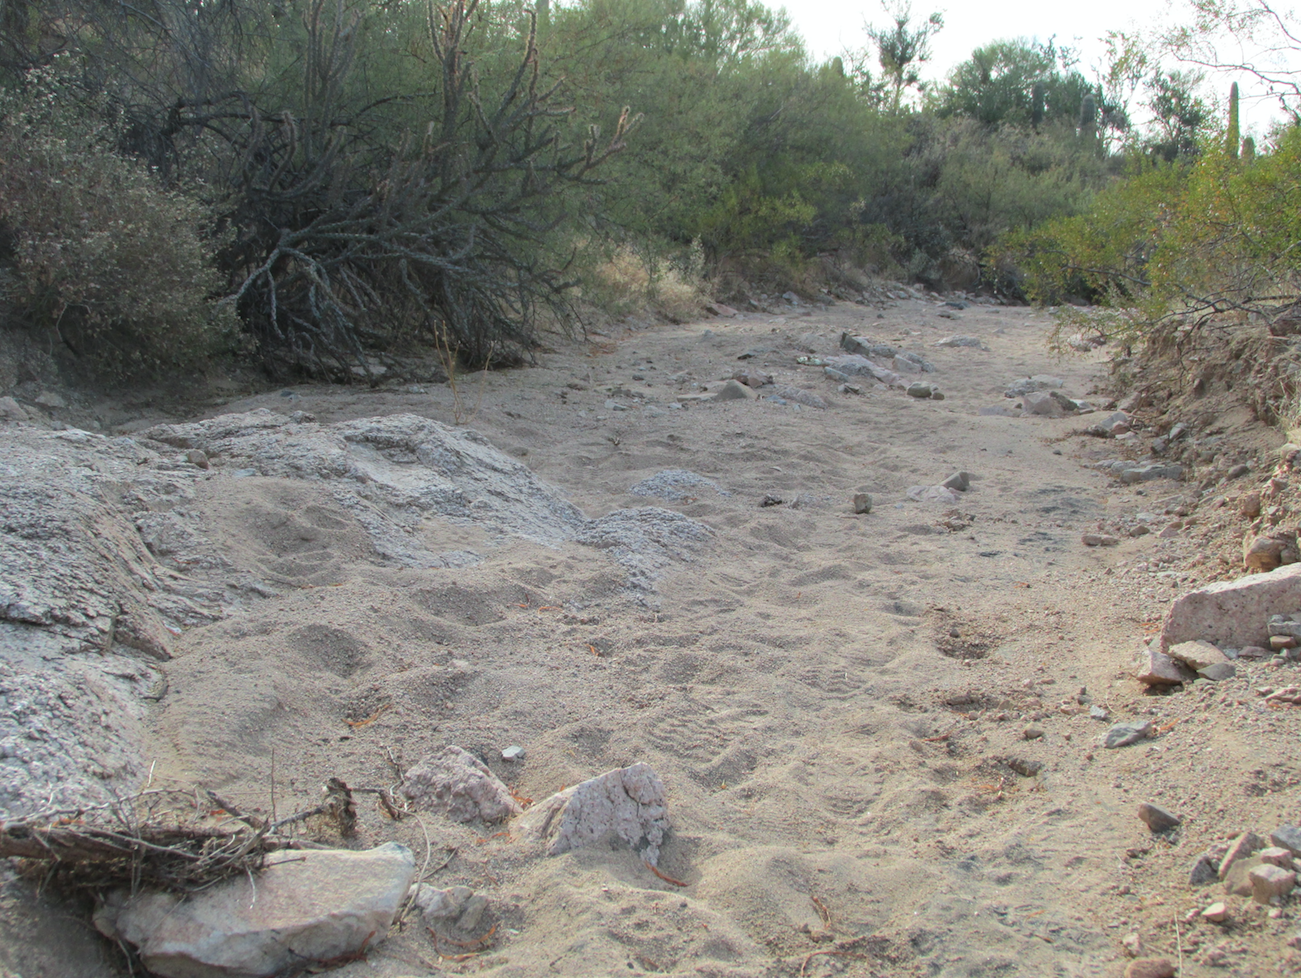 as a massive sluice box. Many of the principles you’re used to when prospecting and mining in waterways, will translate into desert mining. The most important thing to remember is that water is crucial to gold movement. Unlike a running river or creek with highs and lows, desert placers are much different in that gold is moved quickly during a flash flood, leaving gold stranded as opposed to being moved further by continual water flow in a creek. as a massive sluice box. Many of the principles you’re used to when prospecting and mining in waterways, will translate into desert mining. The most important thing to remember is that water is crucial to gold movement. Unlike a running river or creek with highs and lows, desert placers are much different in that gold is moved quickly during a flash flood, leaving gold stranded as opposed to being moved further by continual water flow in a creek.
During a river high-water event in a non-arid area, gold is moved over a larger area by massive water flows that continue until the water slows as the source dissipates its energy. Spring snow runoff is a good example. Rivers rise and sometimes flood based on the upstream water source. When the snow has melted, the river will slowly get back to normal. In the desert, gold is moved in the exact same way with the exception that water powerful enough to move gold does so and then just simply stops. In a flash flood, gold is moved very violently and often a very short distance, sometimes percolating into valuable pockets. Here’s where the difference between water and desert mining principles comes into play generally flood gold will concentrate in areas that do not meet the standard thought of inside bends and where the water flow becomes lower.
For the most part, desert mining experts recommend staying out of the washes, gulches and dry river beds— that is unless you clearly see exposed bedrock. Gold will settle fairly quickly when it is trapped behind jagged bedrock and small fault lifts that have not been worn down over time by constant water flow. It IS true you can find areas of concentrated gold-bearing material in the washes, however, the amount of time and energy to get through feet of overburden is usually just not worth it, especially when there are higher values to be found outside of the wash.
Follow the leads out of the wash to where the gold lives in higher concentration. Test and sample areas you see with a great deal of runoff from a tributary coming into the main wash. Here you are only digging through the current flood layer and testing for flood gold. Make your way out of the wash carefully looking at the bottom of the tributary and the areas where the water flowed into the tributary. Look closely for jagged bedrock and slight lifts in the ground and then prospect. Continue to test each of those spots. What started as a few specks of flood gold in the main wash can lead to larger and larger deposits on the flats or in slight inclines across the desert floor. Keep in mind that when a flash flood is dissipating, there is not enough energy to move a lot of rock, but the sand will continue to flow a bit, creating great clues.
In general, cool season precipitation (October through April) is the most extensive source of rain in the desert regions. Rainfall is more widespread and of relatively long duration during the cool season. On the other hand, warm season precipitation (May through September) results largely from short monsoon-type thunderstorms.
If you’re ready to head to a sunnier climate this winter, keep these tips in mind and you just might find enough similarities between water and desert mining to make you return every year. Good luck!
Friday, September 30 2022
In an area either rumored or known to hold gold, where should you look first? The creek, the surrounding hills, washouts, or just where? The characteristics of the gold in that area will help you to know where to start. If the gold is flat and pounded, that indicates it’s been in the water a long time. If the gold is coarse and chunky, you know you’re getting closer to the source. When gold is smoother, stop and go back to the coarsest gold and start working upwards until you find the source.
Keep in mind that gold is gold, so there isn’t necessarily a better type of gold. Some is just easier to recover. There are only two types 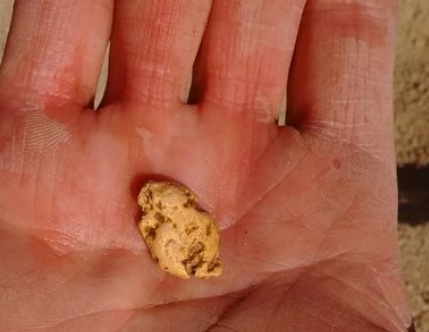 of gold deposits. The first type is “lode” which is simply everything that is still in the matrix and in the ground, and the other is “placer” —or everything else.
Lode deposits refer to gold that is still locked within its original solid rock formation. This formation of gold generally starts as a vein in rock and is formed over millions of years. Since the gold is locked up in rock, and can be mixed with quartz, calcite, pyrite, and other minerals, lode gold usually requires specialized mining techniques to extract. Lode mining takes a lot more equipment and generally a lot more expense and is usually undertaken by large commercial operations instead of the average prospector. Placer gold is the gold that most prospectors are more familiar with. Placer gold isn’t really any different than lode gold. It is simply a concentration of that same gold that has eroded and traveled away from the vein.
Since gold is very dense, it will move downhill much slower than the surrounding sediment. It tends to become concentrated on or near the surface of the lode, forming a “residual placer” close to the original bedrock exposure. Gold found downhill from the immediate outcrop above the nearest watercourse is called an “eluvial placer.” Once it reaches the nearest waterway and is transported by flowing water, the gold now is known as “alluvial placer.” The origin of the dust, flakes and nuggets found by panning and sluicing is usually from a vein up on a nearby mountain.
Bench placers were originally stream placers. Benches are simply where the water used to be, maybe even millions of years ago. They are formed by erosion or geological events such as uplifts, earthquakes or plate drops that changed the stream flow. Some of the most profitable mining is performed on benches. Many benches are highly concentrated by the alluvial deposits that still feed them.
Stream deposits are the last resting place for gold. Once the gold has been released from the lode, gravity and nature does the rest. And unless gold gets stranded on a bench, it will find its way to the water someday. It may take a million years, but it will get there.
When deciding where to begin prospecting, most of the time you’ll want to start panning in a water way, or a wash in the desert where water once flowed. Then let the gold tell you where to go from there. When the gold gets coarse and ragged, start to move up, looking in reverse of how it got to the spot where you found it. In addition to panning and sluicing you may wish to upgrade your mining efforts with a highbanker or power sluice, dredge or trommel. Moving soft soil or river gravel is obviously much easier than breaking rock, but for small scale miners, a rock crusher can pulverize 2 or 3 inch sized rocks into powder in no time. Move more material faster— get more gold!
|


 of gold deposits. The first type is “lode” which is simply everything that is still in the matrix and in the ground, and the other is “placer” —or everything else.


 Atmospheric rivers are large, narrow sections of the earth's atmosphere that carry moisture from the earth's tropics near the equator to the poles. On average, the earth has four to five active atmospheric rivers at any time. A vast majority of atmospheric rivers happen in the fall and winter. The northern Pacific Coast receives the bulk of activity in the fall, and the California coast receives more in the winter. Since December 2022, the U.S. West has been slammed with back-to-back-to-back atmospheric rivers. These events provide as much as half of the region’s annual precipitation, bringing much-needed water to parched lands and adding to the snowpack in the high mountains. This year’s storms have done a lot to restore the landscape drought and is “greening up” the landscape and refilling many smaller reservoirs.
 miners. To do exactly that and learn how copper and other ore was first mined in Bisbee, Arizona, take the underground Queen Mine tour. Outfitted with hard hat, miner’s headlamp and a neon vest, visitors ride 1,500 feet into the mine and learn about equipment, techniques, dangers and a century worth of history. Tour guides are actual retired miners, so you know you’ll get the real highlights of working underground. You’ll learn about blasting with dynamite, the role of mules, and even how miners went to the bathroom while working in the mines!
 Huachuca, was on a scouting mission against the Apache Indians. Lt. Dunn and his men camped on a spot that is now occupied by Old Bisbee, only several hundred yards from the beginning of today’s mine tour. On a walk after dinner, Lt. Dunn picked up an interesting rock. He found a few more pieces along the slope of the south wall of the canyon. Unable to do anything about it because of military duties, Dunn took a prospector by the name of George Warren into his confidence and struck up a deal by which Warren would locate claims and work the property with Dunn as a partner. But on his way to the site, prospector Warren stopped to enjoy his favorite pastime—drinking whiskey with friends. Warren soon had new partners and staked a group of claims with them, leaving Dunn completely out of the deal.
 used in as well as the targets being sought. A change in any one of these variables may require a different searchcoil. Sometimes changing the search coil on your metal detector is the next best thing to buying a whole new machine! It is possible that merely changing the coil on your detector will lead you to a host of new targets.
 significantly reduce ground interference and, thereby, recover the performance lost by a concentric coil over mineralized soil. With the Double-D, it is the arrangement of the TX and RX coils that produce a canceling effect of ground signals. This configuration is called DD because both TX and RX coils are in the shape of a “D”. The positive detection fi eld of the DD runs beneath the overlapping center section from front-to-back. The remaining portion of the coil actually produces negative (i.e. canceling) detection fields. It is this canceling field that allows the DD coil to maintain performance over mineralized ground. Because of its small positive detection field, the DD is inherently less sensitive than a concentric searchcoil of the same size, over non-mineralized ground. The Double-D will, however, significantly outperform the concentric coil over mineralized ground. For this reason, it is highly recommended when hunting over mineralized ground commonly found when prospecting and relic hunting.


 as a massive sluice box. Many of the principles you’re used to when prospecting and mining in waterways, will translate into desert mining. The most important thing to remember is that water is crucial to gold movement. Unlike a running river or creek with highs and lows, desert placers are much different in that gold is moved quickly during a flash flood, leaving gold stranded as opposed to being moved further by continual water flow in a creek.