


Sunday, December 20 2020
There is truly no single “best” type of detector when it comes to gold hunting. But understanding the differences between a VLF (very low frequency) and a PI (pulse induction) detector and their coils can help you decide which detector might be the “best” to use in a A VLF machine can have an advantage on shallow and very small targets, on and off of bedrock— as long as you can keep it stabilized, ground balanced, and the sensitivity set properly. PI detectors generally do better at greater depths than VLF machines, especially in highly mineralized soils. Mono coils are designed for PI detectors. There is a single winding inside the coil that puts a concentric pattern into the ground. You will always get more depth with a mono coil, but it is more susceptible to ground mineralization noise and it will be affected by the ground mineralization itself. Double D coils work for both PI and VLF detectors. Double D coils have two back-to-back D shaped windings inside the coil. At all times the coils are transmitting and receiving across the plane of the coil. The Double D design is like a knife blade that goes into the ground down the center of the coil. These coils are great at handling mineralization where it essentially takes the ground mineralization and distributes it all the way across the blade, lessening its effects. Concentric coils work with VLF detectors by using two separate windings inside the coil— one sends and one receives. When it comes to a round versus elliptical coil, there is really no difference in the size, only shape. Coils are measured off of a round coil configuration. For example, a 14 x 10 inch coil will have the same attributes as a 12-inch coil. The key difference is that elliptical shapes work extremely well in difficult areas. Although each metal detector has its pros and cons, you can’t go wrong by wearing the best headphones possible, no matter which brand or model you choose. Many gold nuggets you will find are only slight whispers in the detector’s threshold, so you want to always wear high quality headphones. Plastic scoops and a digging tool with a wide blade should also be in your accessory bag. When hunting, limit the amount of metal on your body, which includes wearing non-magnetic boots and belts. Put your car keys in your back pocket. Keep your cell phone in your back pocket, too, and make sure it’s off to avoid any interference. Saturday, December 05 2020
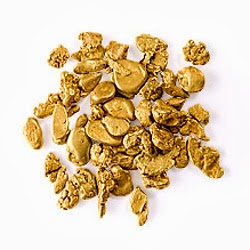
With gold prices on the rise, you might be wondering if now is a good time to sell some of the gold you’ve found over the years. And if Gold dust consists of flour, fines and flakes. This is the stuff most prospectors find as a result of panning, sluicing and dredging. This form of gold is probably the lowest value because it will have the most impurities. Small nuggets start at about 1 gram and are a step up from gold dust in value. Medium nuggets, on average, weigh up to 31 grams or 1 troy ounce. Large nuggets are defined as weighing 1 troy ounce or more. Larger nuggets usually command higher prices, and could be considered museum quality. Gold in quartz is usually a collector’s item or a museum piece, therefore, prices widely vary. Keep in mind, though, that even nuggets that appear to be pure gold are not. They will have impurities embedded and blended into the matrix. There is no such thing as 100% pure gold from nature. In fact, in North America, the average purity for prospected and mined gold averages 60% - 85%. The impurities in natural gold consist of metals such as silver and copper and other minerals that have combined with gold on a molecular level. Tests, referred to as an “assay” must be performed to accurately measure the purity of gold. Some jewelers and pawn shops can analyze your gold to determine purity with an XRF gun (X-Ray Fluorescence); expect to pay a charge for that service. The majority of gold bought and sold from small-scale prospectors include: private buyers (some advertise on eBay, Craigslist, and other online sites) pawn shops, independently owned jewelry stores that craft and repair their own jewelry, museums looking for unusual specimens or rare nuggets, and refiners. Most refiners are contracted by large gold mining operations, but some smaller refiners will purchase gold from prospectors in any form or mesh size. An internet search will reveal refiners that will buy from individuals. If you want to sell your fine gold or nuggets, there are a few things to do first. You may not get a totally accurate assessment of your gold’s value, but you’ll at least have a ballpark estimate. Do NOT melt your gold. Keep it in its original form.
When you make contact with potential buyers who specialize in raw and natural gold, be sure to ask about and understand their procedures and policies and payments. Ask how your gold will be assayed and how the purity is determined. If you are shipping your gold to a buyer, understand their requirements for packaging and shipping, insurance, and other safeguards. Some buyers pay for the testing and shipping, others pass along the costs to the seller. Remember that buyers have costs and will not pay 100% of the spot price. The exception to this would be if you have museum specimens or very large nuggets. In those instances, buyers will pay more than the spot price. Be patient and shop around to not only get the best price, but to find a buyer who you can work with now and in the future. Get recommendations from fellow prospectors, or clubs such as GPAA (Gold Prospectors Association of America). If possible, make your first transaction with a new buyer a small one to assess your experience and satisfaction with the overall sales process. When you feel you have had a successful first transaction, you’ll feel confident you can continue that relationship in the future. If you've not yet found your first gold, get Alaska paydirt here. Monday, November 16 2020
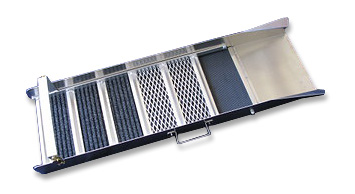
The use of water for grinding and milling has been in practice for thousands of years. From simple water wheels to inventors such as Water Flow. The easiest example of how water dynamics affect gold is the classic inside bend in a waterway. When stream flow is straight and velocities are at their highest, gold will be suspended in the flow. As a bend in the stream causes flow to begin slowing down, the heaviest gold begins to drop out because the water no longer has enough velocity to suspend the material. The stream continues to lose power as the bend length increases and smaller and smaller gold continues to be deposited until there is no longer any in suspension, or the remaining water flow and speed cannot carry it farther downstream. Water velocity and flow affect attempts at recovery in all capture devices in exactly the same way. Each piece of gold in classified material requires a certain flow and length of time to separate, drop out, and be captured based solely on its relative size and weight. If the velocity and flow are too great, the gold will remain suspended and will exit the machine regardless of machine length or method of recovery. This is why some miners are lured into a false sense of security just by using longer sluices. Improper water depth in the sluice can create additional problems in recovery. Methods of material collection have much less effect if the gold is suspended in the upper part of the water flow. Most sluices provide little or no material agitation to break up the classified material and provide the necessary change in flow that facilitates gold separation. Lack of agitation allows smaller pieces to be carried through the equipment. Classification. There is a direct relationship between material classification and water speed, which is often overlooked. It is common to classify for ease and speed of filling buckets rather than size of gold being targeted. Larger classification requires increased water speed to push the material through most recovery systems. The trade-off is forfeiting recovery of finer gold by increasing the length of drop time. This reduces the number of gold capture attempts and even machine effectiveness by having concentrations of larger material wedging into riffles, drops, etc. Running dry material requires the sluice to liquefy the material while it is passing through. Gold particles will suspend in the dry material, reducing the chance of capture. Many miners use a scoop and drop their material into the machine in large clumps. This also allows particles to suspend instead of being processed. Material should always be wet prior to processing, and material should be cast (sprinkled) side to side across the machine when using a scoop. Riffles. Some riffle designs are actually not that ideal for gold recovery. Some sluice riffles are evenly spaced, making them too far apart to impart the “vortex” or reverse underflow. What actually happens is an up-and-down wave motion as the water travels down the sluice. The only “action” imparted is the same negative flow that happens when water flows over a rock or some other obstacle in a stream. Material suspended at the bottom of the flow is deposited as the water climbs over the riffle and slows. Material that is heavy enough and can no longer be suspended drops. The rest of the material remains in the flow and continues to be carried down (and possibly out of) the sluice. Flare. Most modern riffle sluices (standard and drop designs) are susceptible to improper setup angle, which can either clog the machine with material or blow it out completely. Either problem results in the loss of gold. Another big mistake in sluice design and operation is the “V” fallacy. The idea that channeling your water towards the center of the sluice using a wide-angle flare will increase its effectiveness and therefore increase gold recovery is false. On top of that, miners drop material into the center of the slick plate. This forces material into the center of the sluice, which is quickly overloaded by the volume of material and will cause the first series of riffles to lose their effectiveness. Remove the flare from your sluice to eliminate the center concentration and create an even flow across the machine. You can create a V-shaped wing dam with a short straight section in front of your sluice if you need increased water flow or speed. Casting your material across the width of the sluice will eliminate overloading of the riffles. Understanding how water height and speed changes your recovery can also make all the difference in boosting gold returns: Water height. Begin with the water flowing just above the riffles or drops. Run small amounts of material and watch as the dirt passes through the sluice. Notice how the material enters the riffles or droops. Be sure to use the correct method of casting material evenly from side to side. Gradually increase the water height until processing suffers. This will determine the minimum and maximum water height for your sluice or highbanker. Water velocity (speed). Set your sluice water height for max processing and a fairly fast flow, then gradually reduce water speed as you process small amounts of material. You may have to adjust your sluice to maintain proper water height through this process. Note how changes in water speed decrease the quality of material processing. Spend some time exploring water dynamics. Introduce only one variable at a time, and verify how your gold recovery is affected before moving on. No doubt, with a little more understanding and experimentation, you’ll recover more gold with your sluice! Monday, October 19 2020
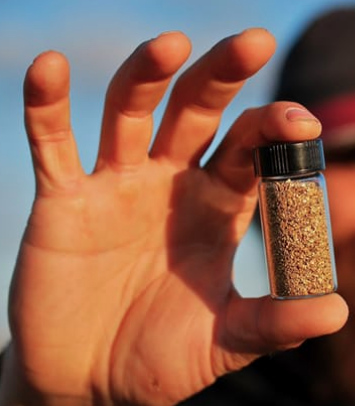
Are you excited about finding gold — ANY size gold? Most of us are, but if you want to sound like an old pro when referring to a Flour Gold: Gold particles that are barely visible to the naked eye. It’s so powdery, like flour, that it sometimes floats instead of sinks like heavier gold pieces. Flake Gold: A piece of gold that is large enough to easily spot, but is difficult to pick up with your fingers. Use tweezers. Fines: Particles of gold too small to pick up with your fingers. Combination of flake and flour gold. Picker: A piece of visible gold large enough to easily pick up with your fingers. Gold Nugget: Larger than a picker. A naturally formed lump of gold that is big enough to put in a poke and likely won't fit in a typical small vial, depending on its shape. Specimen: A naturally formed large gold nugget or gold-laced quartz specimen. Paydirt: Refers to dirt that has enough gold in it to be worth extracting. The term originated in the mid-1800 during the California Gold Rush. Today, you can even buy Alaska paydirt through the US Mail! Concentrates: All the gold-bearing material left in your sluice or trommel, etc. after using your gold recovery equipment - usually black sand mixed with fine gold. Fool’s Gold: The bane of any prospector’s existence! Iron or copper pyrites and mica can be mistaken for gold. The quickest and simplest test is to examine your sample in the shade, not in the sunlight. Real gold retains its yellow sheen even in shadow, whereas fool's gold does not. Real gold is soft and malleable; it can be cut with a knife and won't splinter. You can even "dent" it with a pin. Fool's gold, though, is hard and flaky. A drop of hydrochloric (muriatic) acid will tell you for sure. Real gold will not be affected, but if you see a slight foaming action and the sample begins to dissolve, you know it's not real gold. Color: Slang for any amount or size of visible gold that you find in your gold pan. Au: Gold is element 79 and its symbol is Au on the periodic table. As a pure metal, gold is extremely heavy with a specific gravity of 19.3, which means pure gold weighs 19 times more than an equal amount of water.
Thursday, October 08 2020
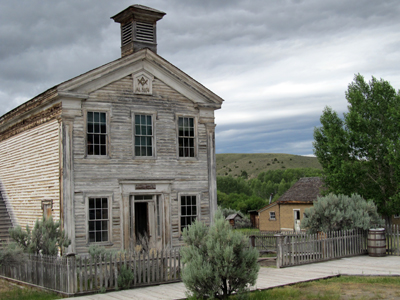
Has Covid-19 put the kibosh on local haunted houses, trick-or-treating, and Halloween parties this year? Not to worry, you can still find some socially distant ghostly fun this season— visit a gold mining ghost town! About 3,800 ghost towns are still standing across the USA, mostly out West. Some of the buildings are in great condition, others are quite literally falling down. Some towns have become well-known, easy-to-reach roadside attractions, others are quite remote. Each town has its own boom-to-bust story that makes a visit both interesting and educational. Whether you’re a ghost hunter or a history buff, please leave everything as you find it. Take lots of photos, but no souvenirs.
Bodie State Historic Park, California. When a little girl writes in her diary “Goodbye God, I’m going to Bodie” you know her Oatman, Arizona. If you’re out to get some kicks on historic Route 66, stop in the ghost town of Oatman, Arizona. Born as a tent camp for gold miners in 1906, the town boomed, then busted in the 1940s, and has since come alive again. Over half a million tourists visit Oatman each year, greeted by friendly resident burros looking for a carrot snack! Although there are gift shops, staged gunfights, and costumed entertainers strolling the streets, Oatman takes pride in keeping the flavor of the town as authentic as possible. You won’t find newly renovated buildings here—Oatman’s historic buildings are definitely from a bygone era. As you stroll through town, watch for signs and painted murals. One particular interesting sign shares the history of the Oatman name. It was originally named Vivian, after the Vivian Mining Company. It was later renamed Oatman in honor of Olive Oatman, a woman kidnapped by Indians in the 1850s, and released five years later for a ransom of one horse, four blankets, and some beads. Signs also tell you that the town appeared in several movies such as How The West Was Won, Foxfire and Edge of Eternity. Bannack State Park, Montana. Although the old-time prospectors are long gone, many mining relics and over 60 buildings remain at Montana’s Bannack State Park. Most are so well preserved that you can actually go inside them— a rare treat when it comes to ghost gowns. Bannack’s rich history began 150 years ago with John White’s discovery of placer gold along the banks of Grasshopper Creek. In July 1862, Mr. White filed one of the first recorded mining claims in what was later to become the state of Montana. Good news traveled fast and by fall of that year, “Grasshoper Diggins” was home to 400 prospectors. By the following spring, the population had swelled to 3,000 — the Gold Rush was definitely on! On the southeast end of Bannack, the Bessette House is believed to be haunted by the children who died here during an epidemic of scarlet fever. The site is nicknamed the Crying Baby House because of the sounds some visitors have reported hearing. Keep the old timers in mind as you stroll through these or any other gold mining ghost town. It will give you a new appreciation for modern gold mining equipment and metal detectors that makes gold recovery so much quicker and easier. It really puts into perspective yesteryear’s impact on the gold mining we do today. Find more information on ghost towns, gold mine tours, and travel articles on historic sites here. Sunday, September 13 2020
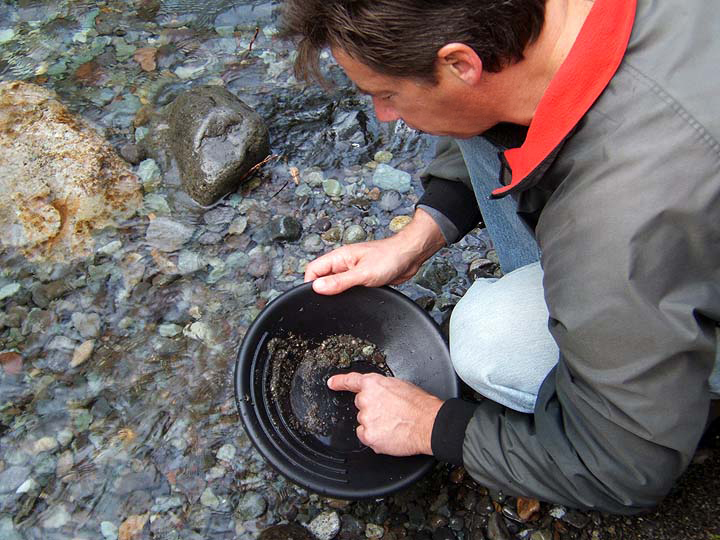
The most basic piece of prospecting equipment is the gold pan. Size, color, and shape are really a matter of personal preference. Plastic pans generally come in green, black, and blue. The color doesn't effect performance, but green is the most common. Plastic is light weight, so when you add water, dirt, and gravel to your pan, your arms won't get as tired compared to using a steel pan. It's good to have a couple different sizes of gold pans on hand (10 inch, 12 inch, and 14 inch are the most popular). Saturday, August 01 2020
The maintenance fee for an existing lode claim, tunnel site, or mill site will increase to $165 on September 1, 2020. For placer mining claims only, the fees will be $165 for every 20 acres of land or portion thereof. Miners who file a Small Miner’s Waiver on or before September 1 will be required to file an Affidavit of Assessment Work Form on or before December 30, 2020, including the $15 processing fee per claim. Each payment must be accompanied by a written list of the claim names and BLM serial numbers for which the maintenance fee is being paid. You can find your state BLM office at www.blm.gov. Please note that new mining claims filed on or after September 1, 2020, will be subject to the new fee schedule. It's highly recommended that you send your documents by registered mail or hand deliver them while retaining copies for your records.
When you get to the claim search page, select the state where your claims are located and enter either the last name of the claimant, the claim serial number, or the lead serial number to search for your claim. Claimants who file on paper must include a document listing the claim/site name(s) and the BLM serial number(s) assigned to each claim for which the fees are being paid. Do not forget to file new claim forms or affidavits of assessment with your county recorder as well. Tuesday, June 23 2020
Ocean beaches can be compared to the Mother Lode. Why? Because you can find GOLD on many by mining with a highbanker, and by searching with a metal detector. How lucky is that?! TWO ways to find gold at the same location! Think about it, who hasn’t lost a ring or coins at the beach? Whether you prefer recovering gold by swinging a detector or shoveling into a high banker, your chances of both are higher by visiting a beach this summer that is located in a gold-bearing area. A side benefit is that you’re enjoying the nice weather while it lasts while mining the beaches in different ways. Beach Mining with a Highbanker When you consider the advantages of beach mining with a highbanker— easy access in all seasons, no classifying material down to size, no digging in heavy cobbles and moving boulders, no worries about rattlesnakes or poison oak— the idea is very appealing. Of course any new environment means there will be a learning curve. Recovering 100 mesh gold from the beach requires a little extra attention to detail to prevent loss, so you’ll need to readjust your equipment and process. Don’t expect chunky nuggets; you’re going for the flour gold here. High tide, not your watch, will dictate your schedule. The general principles you already know are the same, but also keep these tips in mind. • Slow down. Expect to process about 10 gallons of material an hour. If you try to feed a highbanker faster or use bigger scoops you will likely lose gold. The most efficient way to locate the paying black sand layers is to use a post hole digger or earth auger. The pay layer is usually right on top of a golden brown sand layer that pushes up into the black or blue sand. Frequent storms can remove the light sands and reconcentrate the black sands. • Use about 25% of the water you would normally use. You may need to modify your spray bar to compensate for less water volume so you aren’t fighting foam and bubbles. • The beach is a level playing field—literally, so tip your box to a 9-degree angle and go from there. Most beach miners use battery-powered bilge pumps to run their beach sluices. A small gas-powered pump also will work. A Gold Cube is also an excellent piece of recovery equipment to concentrate beach material, then run it through a Blue Bowl. • Do frequent clean-ups. Beach Mining with a Metal Detector Water and sunscreen have a sneaky way of slipping rings from fingers of swimmers and sunbathers, making beaches a lucrative location for metal detecting. There are actually several similarities between beach hunting for jewelry and hunting for gold in the rivers. At the beach, stuff that is lost in the upper sand areas make their way down into the surf during large storm events just like gold is washed downstream in the same storms. You can find an occasional nugget above a river in gold country, but you’re going to make your best finds when you locate the pay streak where nature has concentrated the gold. The same is true of the beaches. You will find that the surf sorts out materials, and when you are really lucky, you can identify a pay streak. In a river, the gold pay streaks follow the downstream flow of the river, but on the beach the pay streak will typically run horizontal across the beach. After items have been in the sand/surf for some time, the wave and current action tend to sort thing by weight and density. The pull tabs will be in a certain line, the lighter coins further down towards the deeper water, and when you start detecting fishing weights, you are likely nearing a pay streak. That is where you are most likely to strike gold— as in gold rings, bracelets, pendants, etc. Wet sandy areas are particularly lucrative for detectorists. The reason for this is that beach-goers first congregate at the "towel line" and then migrate to wet sand. The "towel line" is an invisible area where the majority of people plop down their towels and coolers and umbrellas. At the towel line, sunbathers slather on slippery sunblock and tanning oil that acts like a lubricant and lessens friction. After baking in the sun for a while, they will need to go into the water to cool off a bit, which is where the body's natural reaction to cold is to shrivel up. Less friction + shrinkage = rings in the wet sand you can find with your metal detector! In all types of beach hunting, the discrimination must be kept very low, eliminating only small iron (bobby pins and nails). Aluminum pull tabs and tin foil should not be discriminated or you will lose some gold and/or platinum rings as well. Some beach hunters operate with zero discrimination and dig everything. Use of a sand scoop makes target recovery fast and easy. It’s important to realize that most gold rings will read in the “middle” tones (above iron but below coins). If you’ve ever hunted the beach you have no doubt found your share of unwanted nails and other litter. To solve this, lace a rare earth magnet in the scoop to quickly capture those small, annoying iron targets. If you’re going to hunt the salt beach areas, you’ll want to get a heavy duty plastic scoop. A steel scoop will rust fairly quickly in those harsh conditions. If you intend to hunt IN the water, of course you will need a waterproof metal detector and waterproof headphones — one that can handle salt water mineralization. There are some good pulse induction machines that work extremely well in salt conditions. Very shallow water is no problem but when you hunt waist deep water and deeper you should consider a mask and snorkel. If possible, hunt at low tide. That way you can get further out and hunt where other detectorists might not have gone. Plus, the surf tends to pull things down the beach and out into deeper water.
Saturday, May 02 2020
Researching new areas in which to prospect for gold, gems, or whatever you are seeking can be a lot of work, but since we’re now
Tuesday, March 31 2020
Although “social distancing” has become part of everyone’s new normal, gold prospectors and metal detectorists have traditionally
Depending on our age and general health, some of us might already face a higher than average risk of having a serious medical issue no matter what we are doing or where we are doing it. Many people already deal with high blood pressure, diabetes, heart disease, arthritis, cancer, and more. Not that we can compare these more common maladies to the COVID-19 Pandemic, but the point is that many are already used to taking precautions and living with risks. Folks with existing health conditions have been taking the necessary self-care steps for years, especially when out in the field and far away from a city. How do you protect yourself and others and help flatten the curve until the pandemic is no more? If you want to continue to prospect on a claim, sluice on a waterway, swing a detector, and enjoy the great outdoors this spring and summer, consider these easy tips before you head out:
Of course, commonsense also tells us that if you feel symptomatic or think you may have been exposed, immediately follow the current COVID-19 health care guidelines. Otherwise, hopefully digging in the dirt will provide you with a level of normality that we would not otherwise have if we stayed at home listening to the news 24/7. Start planning your next prospecting trip and take advantage of the greatest social distancing project out there! One that has been around since the time man first found gold centuries ago. And what’s better is that social distancing by prospectors is not driven by fear, but by the excitement of getting out there and hunting for gold! Good luck and be safe! |

 Rhyolite, Nevada.
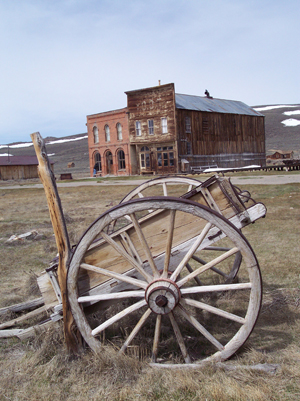
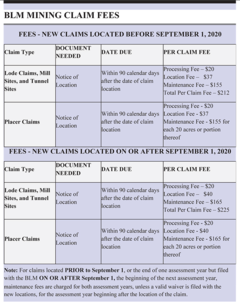 Mining claimants who wish to retain their mining claims on Bureau of Land Management and Forest Service lands through the 2021 assessment year must pay a maintenance fee or file a maintenance fee waiver certificate on or before September 1, 2020, to prevent the mining claim from being forfeited.


|
Nugget of News Blog |